After downloading the app, you must log in. To log in, you can use
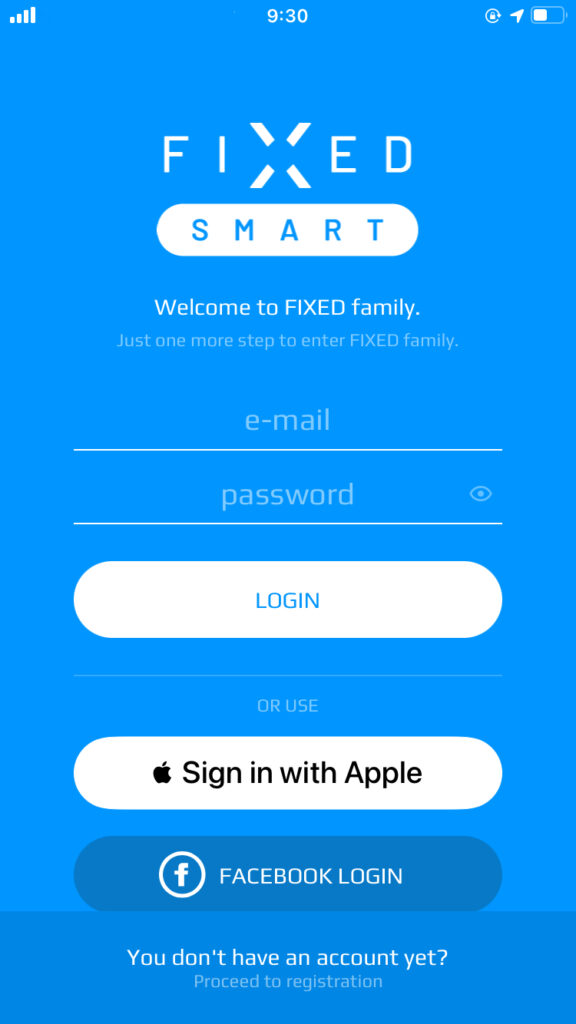
home screen
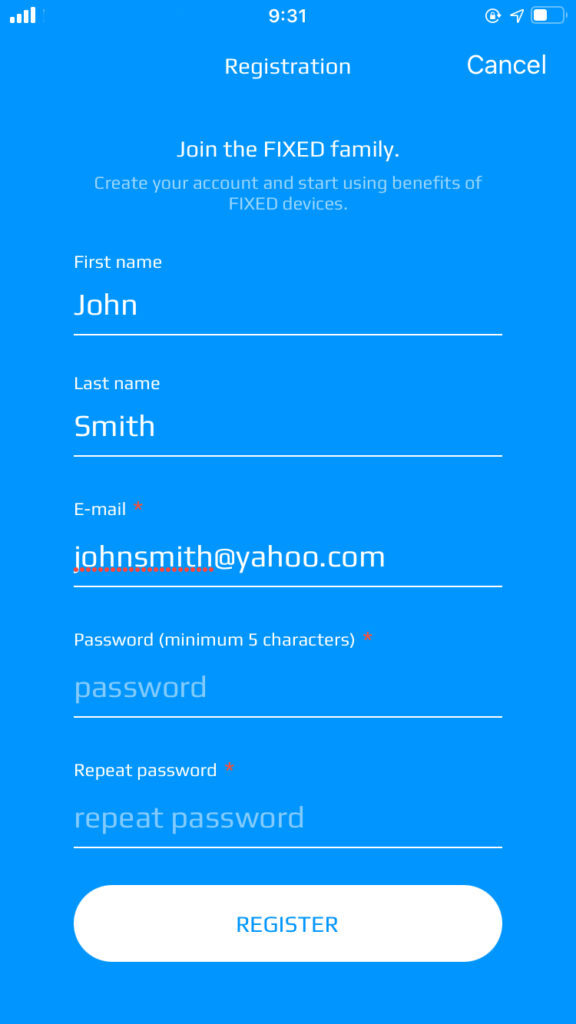
registration form
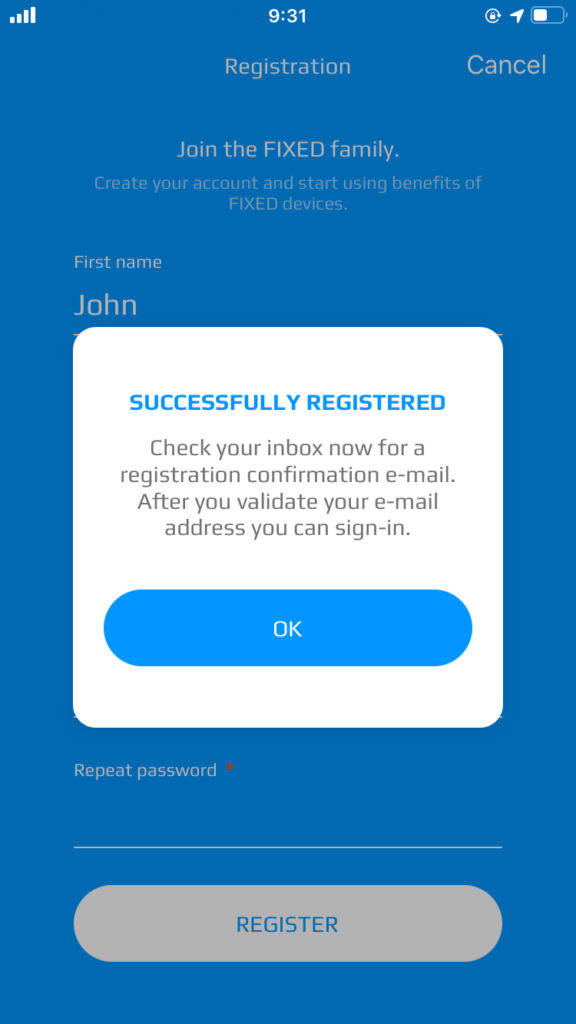
complete registration
The registration form can be accessed by clicking on the bottom of the welcome screen (see the
“welcome screen” image). The registration form will then appear. After filling out the registration form and confirming with the “REGISTER” button, an e-mail with a confirmation link will be sent to the provided e-mail address. After clicking on this link, the registration is complete and you can log in to the app.
When you first log in, you must agree to the terms and permissions. If the necessary permissions are not active, some functions in the app may not work properly. Individual permissions can also be set later directly in the app – in the Settings section or in the phone in the App Management section.
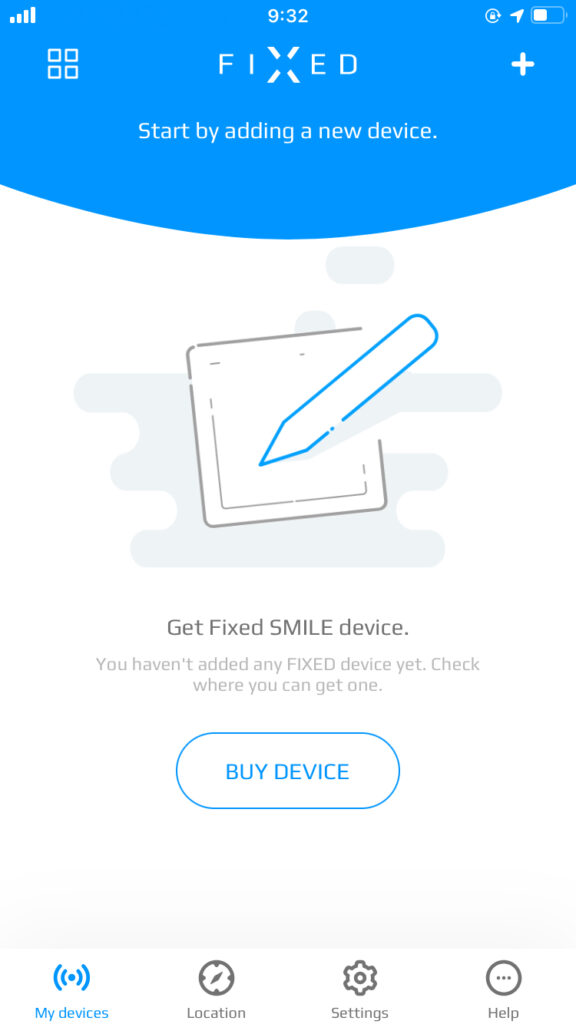
After logging into the app, you will be directed to a page with links to shops where you can buy the device via the
“BUY DEVICE” button. Click to enter the selected e-shop. If you already have the device, click on the plus icon to enter the page with the types of devices that can currently be added to the app.
my device
where to buy
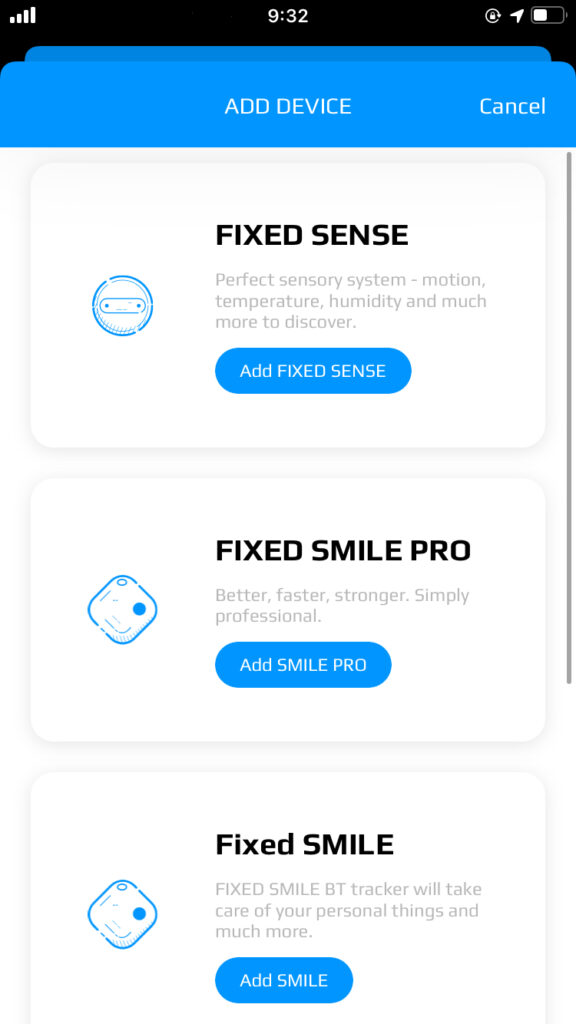
list of available devices
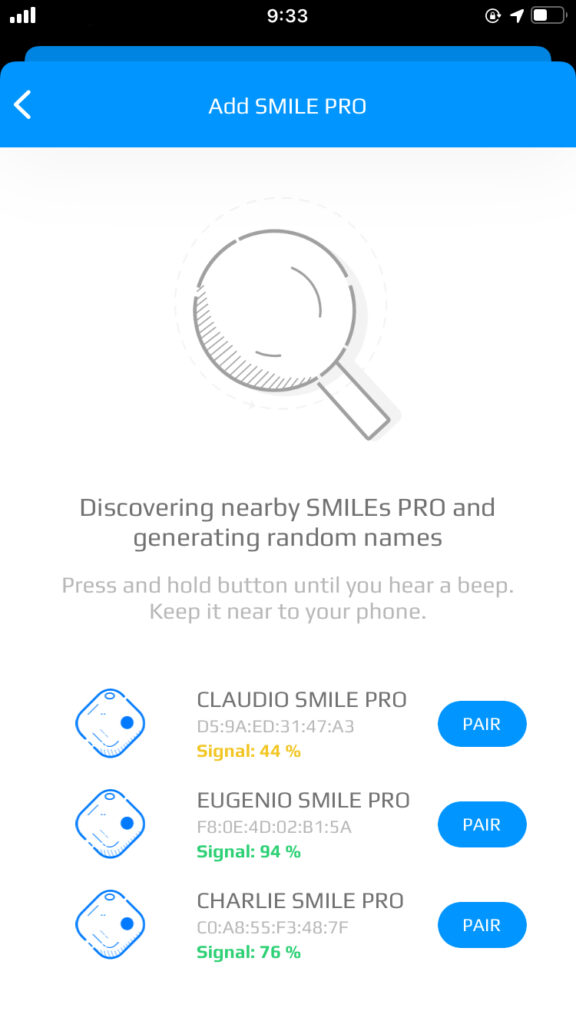
Example: If you are adding a new SMILE PRO device, click on the ADD SMILE PRO box. All SMILE PRO devices that are within Bluetooth range of your phone will appear. Each device always has an automatically generated name, e.g. DENNIS SMILE PRO.
If no device appears, press the button on your SMILE PRO and the device will appear in the
list in an instant. In the case of multiple devices being loaded, the closer the device is, the higher the % of signal indicated for it.
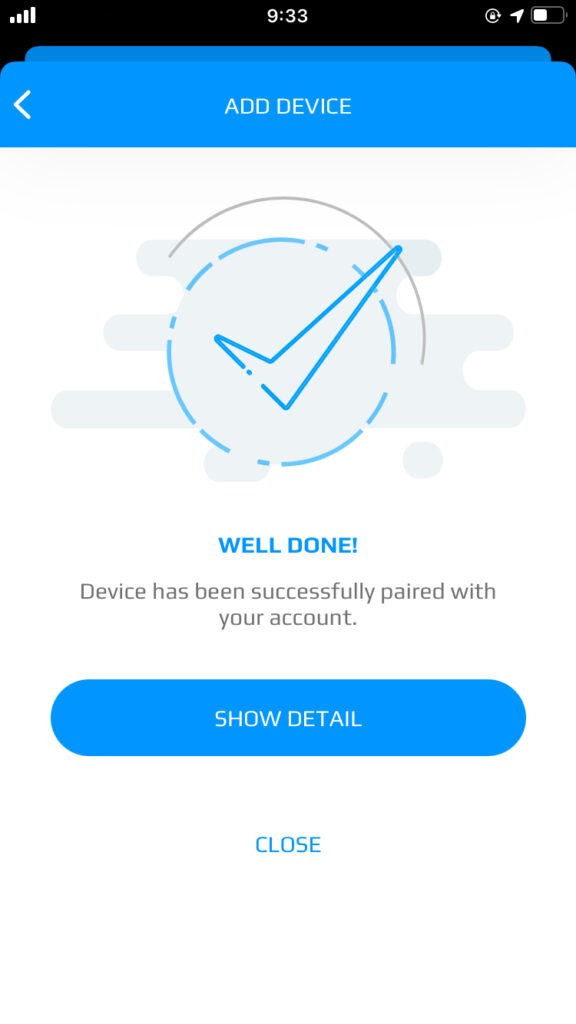
Click on the PAIR button to add the device. After successful pairing, a confirmation screen will appear confirming the successful adding of the device – see figure below. You can then see the device in the My devices menu. If you are trying to pair a device that is paired with a different account, the app will notify you and the device will not be paired.
Follow the same procedure when adding other types of devices.
find devices in range
paired successfully
my devices
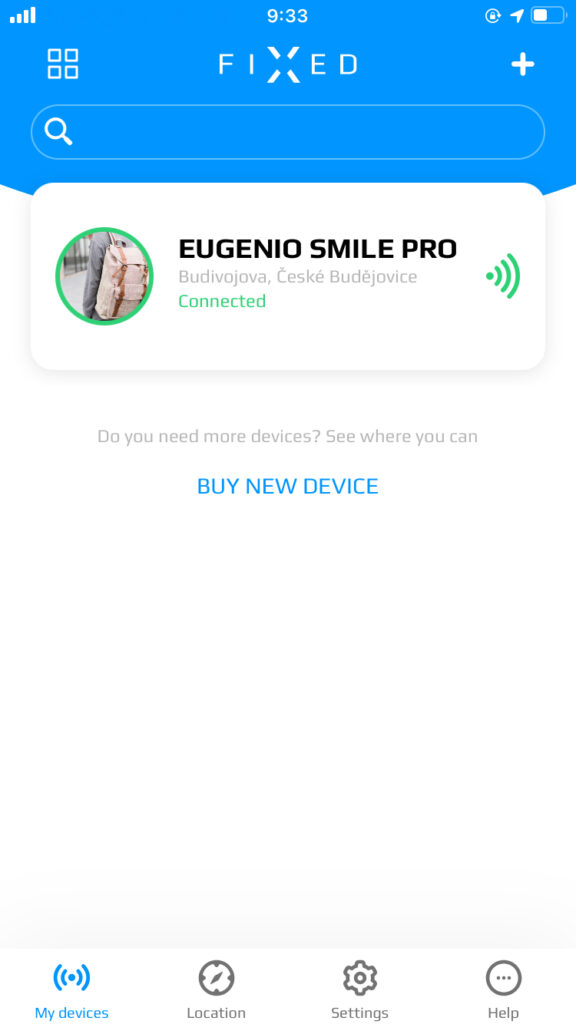
In the app, you can choose how the devices are displayed. You can use the icon in the left upper corner to switch between list and grid view.
You can also use the drag & drop function to change the order of the devices as you please. The widgets also respect the set device order.
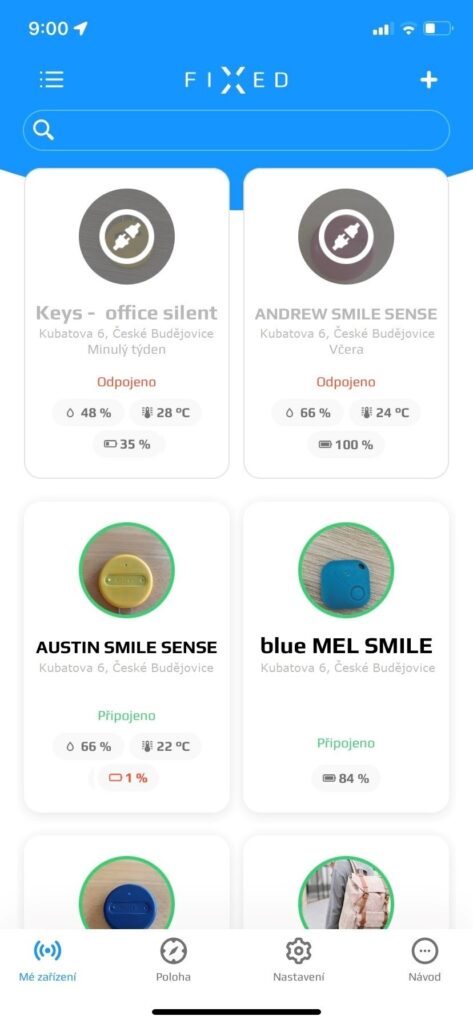
tile wiev
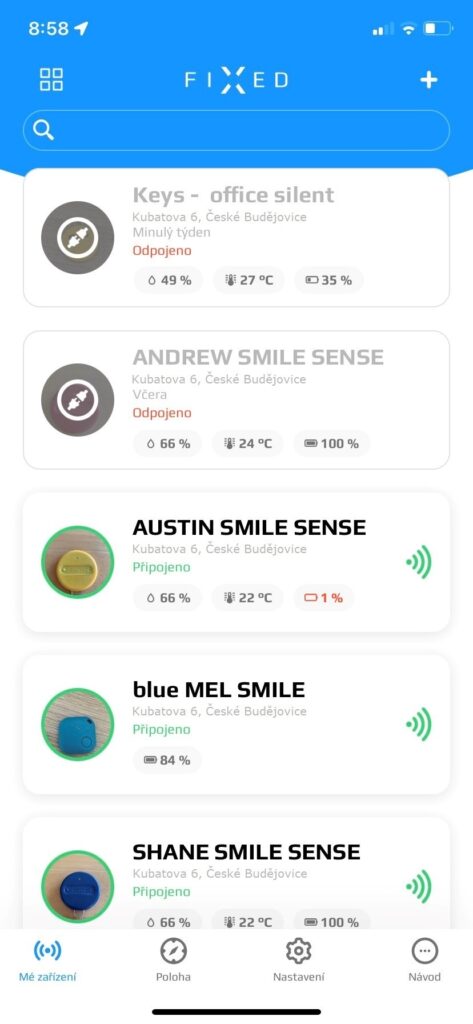
line view
The device overview page provides basic information about the device.
Note: If the sensor is turned off, the last measured value is displayed.
Double-click on the selected device to enter the Functions tab to see its details. After clicking on the selected function, the line with the function will turn blue and the function will start/be activated. Clicking on the blue line again will turn the function off.
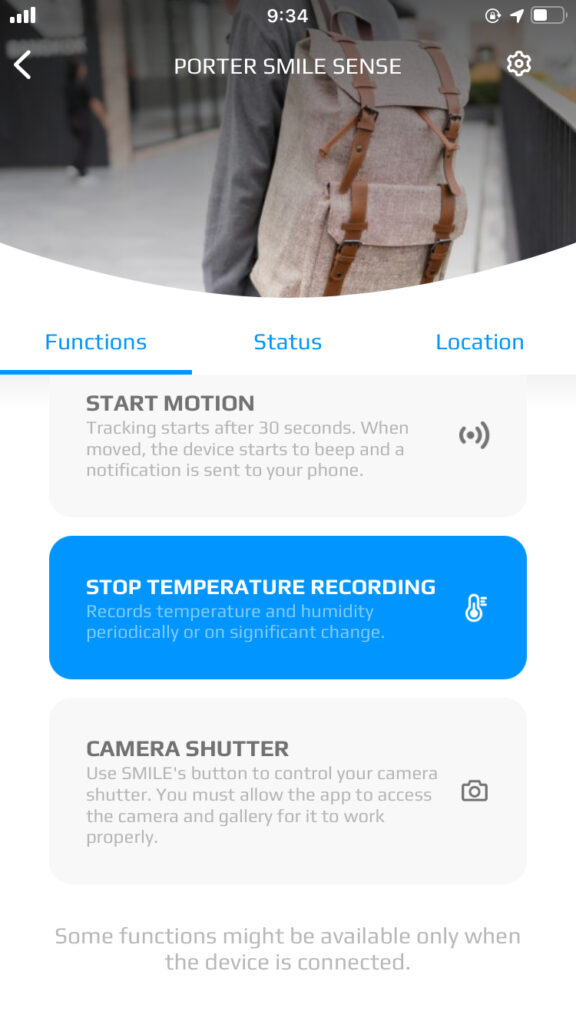
function
At the very end of the list, there is also an option to turn off the device highlighted in blue.
Double-click on the “FIND WITH RADAR” function to enter the radar page. This page shows you how far away you are from the device. The closer you get to the device, the more green circles appear around the device image.
As on the device overview page, the signal strength (distance to the device) is visually indicated by the green/yellow/red framing of the image (and accompanied by a percentage value).
You can also start the beeping to help you locate the device by sound. If the device is out of Bluetooth range of your phone, the radar is grey and a disconnection icon is displayed in the inner circle of the radar.
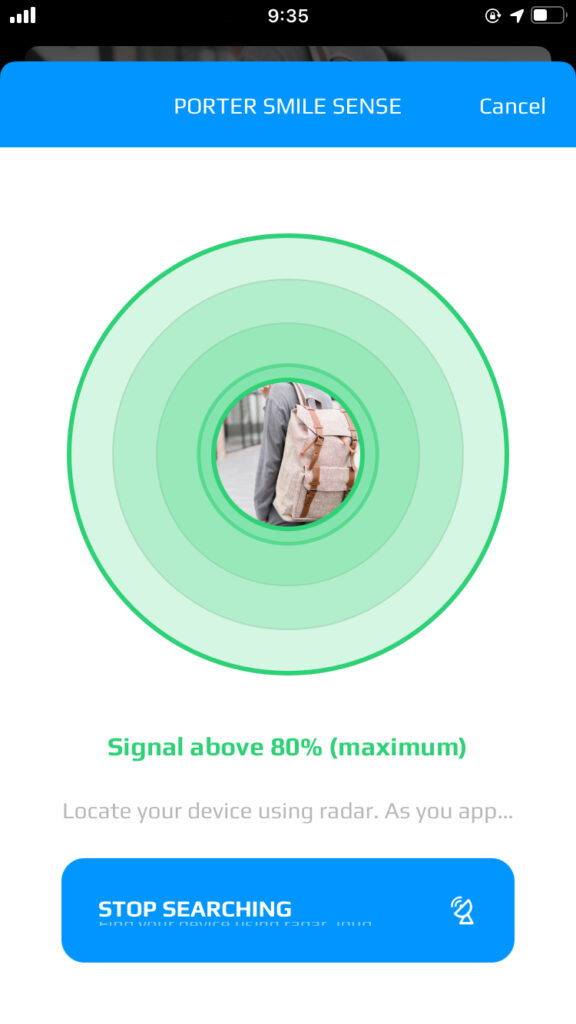
80% and more
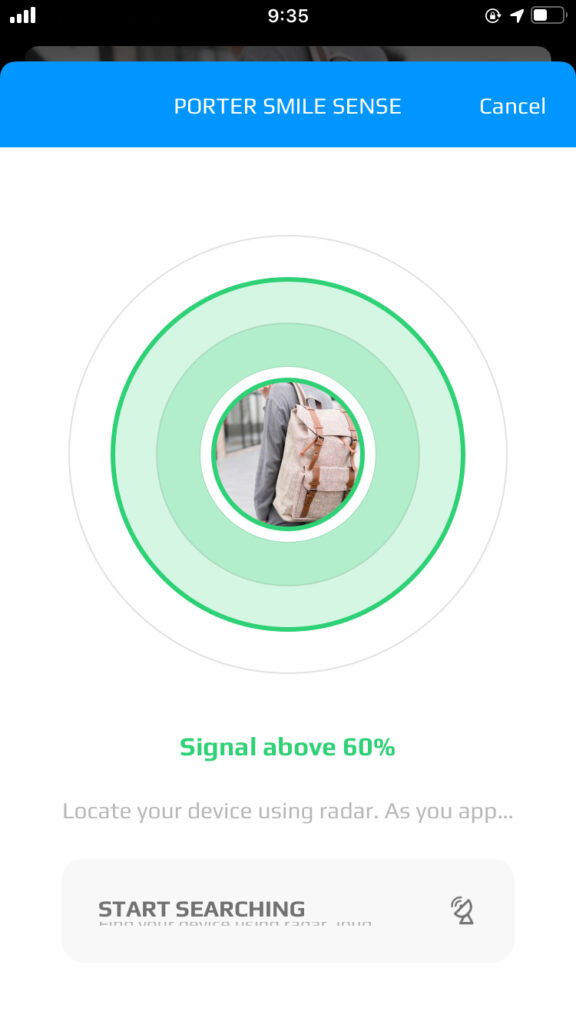
60% and more
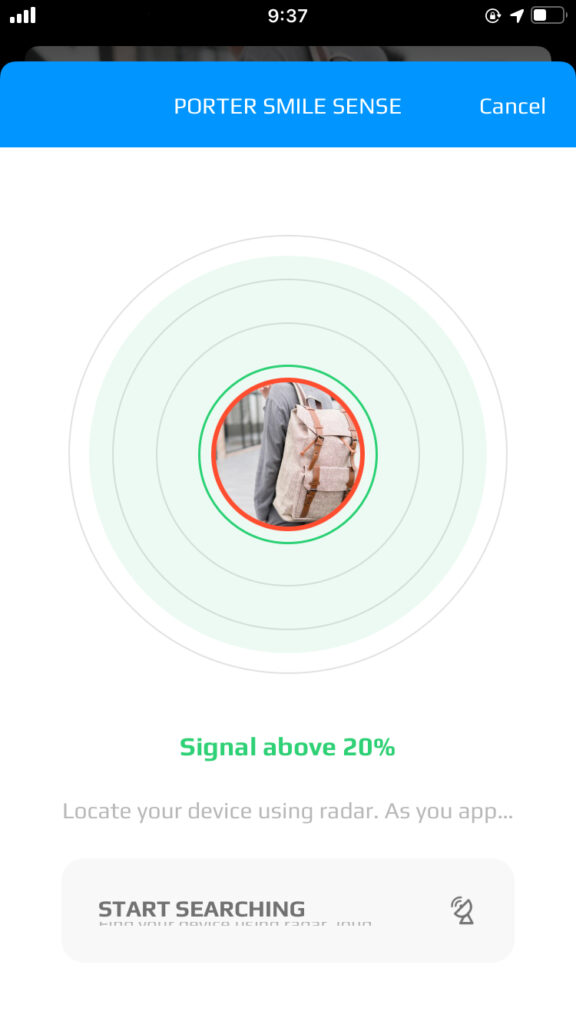
20% and more
You can start the beeping not only from the radar page, but also directly from the Functions page. To stop the beeping, just click on the function again or press the button on the device.
This function helps you to locate the device using the LED on the device. When the function is activated, the device starts blinking. Clicking on the function again will stop the blinking.
status – connected
status – last connected
This function is unavailable if the device is within the range of your phone. This function can
be used, for example, when sharing a device – see chapter 2.5.9. Settings ± Sharing.
When this function is activated, the app starts to track the movement of the device. It will record the date and time when the device moved. You can then set in the Settings of the device what the app and the device should do when it moves ± play a tune, send a notification. See chapter 2.5. Device detail – Settings for more information.
The SENSE device has an integrated temperature and humidity sensor. You can activate the measuring by clicking on the “Start temperature recording“.
The default setting of the interval for the latest firmware version is 180 minutes. If you need a shorter interval, see chapter 2.5.7. Settings – Temperature and humidity settings – for SENSE only.
Caution, the shorter the interval, the greater the demands on the phone battery!
The device can also be used as a camera shutter for your mobile phone. However, you need to enable the app access to both the camera itself and the gallery for this function to work properly. – See chapter 4.4. Settings ± About application for more information. The Camera shutter function cannot be used in any app other than FIXED Smart.
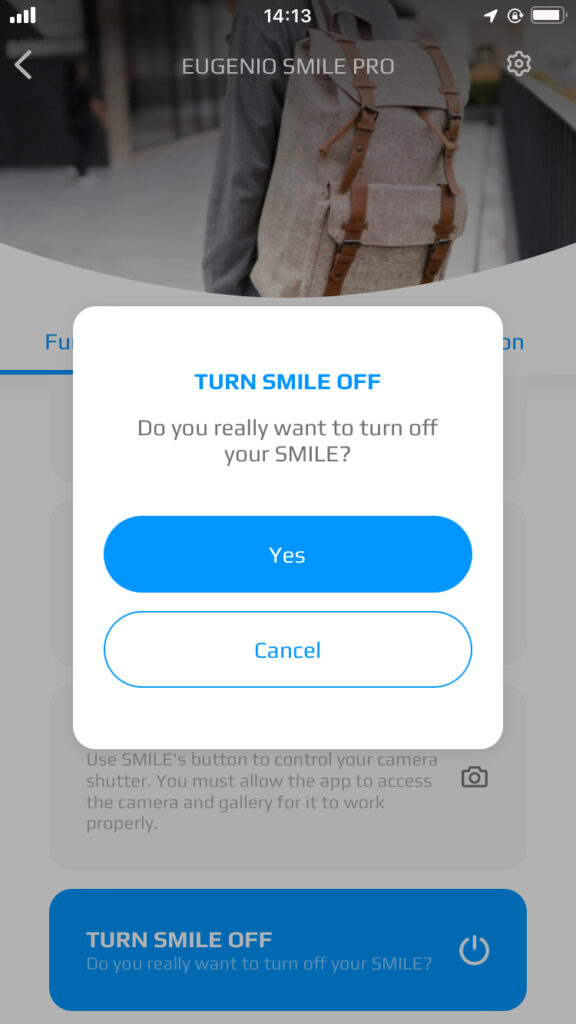
When you tap “turn off”, the app asks if you really want to turn off the device – see image below. Once you agree, the device will be switched off (disconnected), accompanied by an audible signal to announce the shutdown.
The device still remains assigned to the account, but is inactive.
To switch the device back on, simply hold down the device button. If you have an app running in the background of your phone at the time, the next time you bring it to the foreground, the device is active again. If you turn on the device while you are working in the app, you need to force a device status update – that is, minimize the app (send it to the background or turn it off) and then open it again.
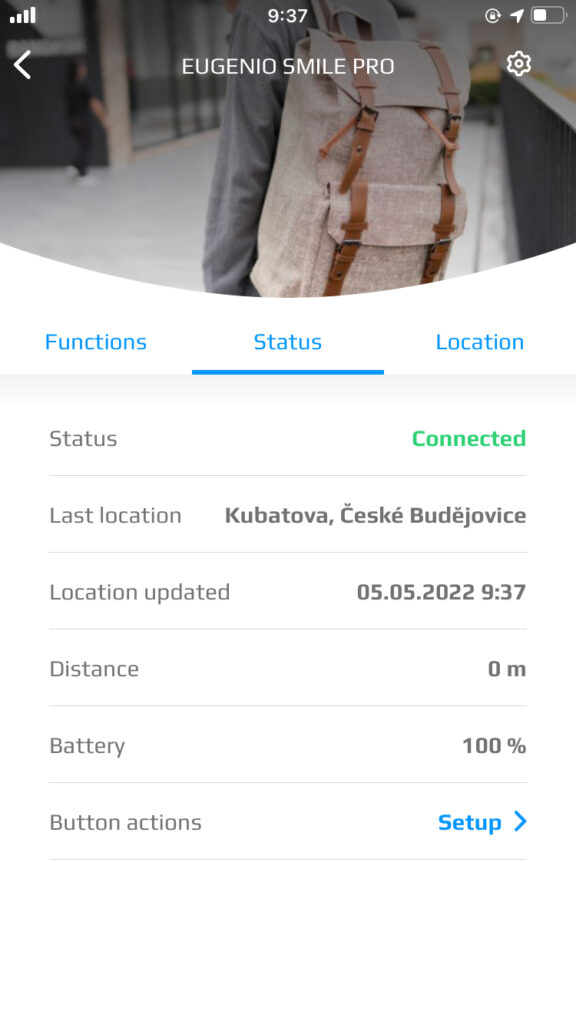
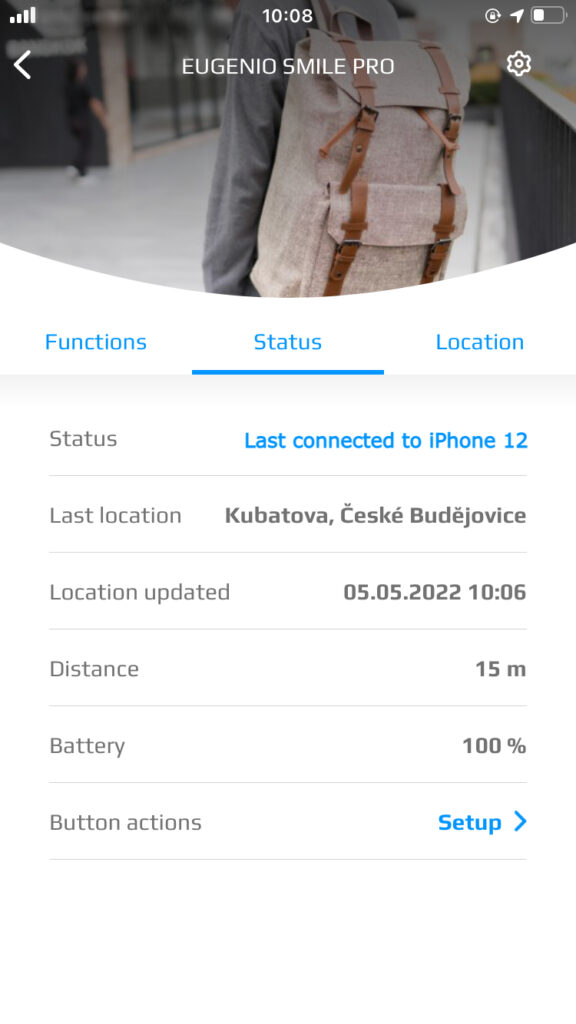
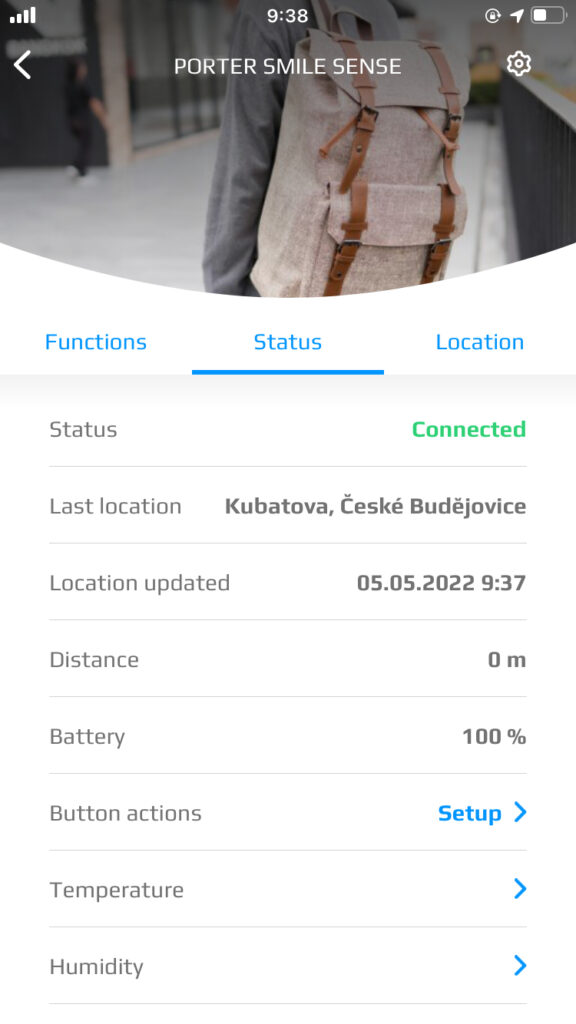
On the Status tab, you can see the current information about the device.
The SENSE device is as opposed to the SMILE PRO device equipped with an integrated temperature and humidity sensor. In addition, the Status tab contains the following information:
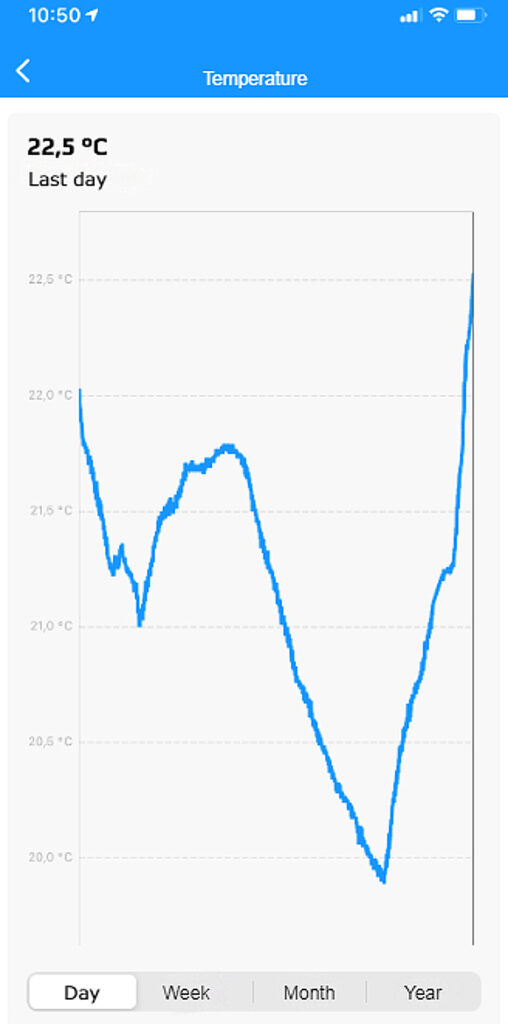
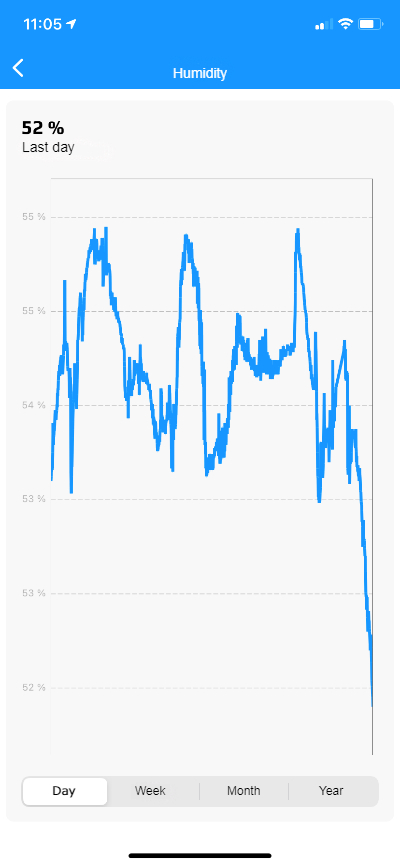
No values are displayed on the Status tab until the temperature and humidity measurement is turned on. If the measurement is on, the last measured value is displayed. Click on the blue arrow next to the value to display a chart with the measurement results for the last day, week, month, year. The chart with values for the last day is displayed by default.
without measurement on

with measurement on
temperature graph – last day
On the chart page, you can also switch to display values for week/month/year. On the right side of the chart there is a vertical line that can be moved around the chart by touching it to get the value for a specific date. This specific date is then displayed instead of the “last day/week/month/year” text.
humidity – last day
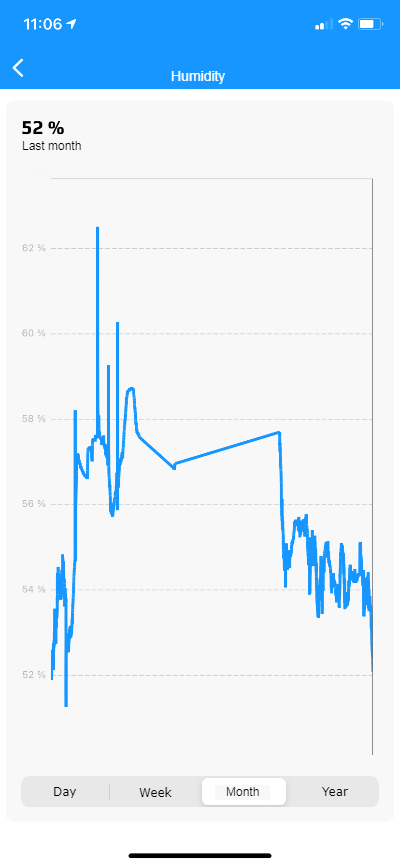
humidity – last month
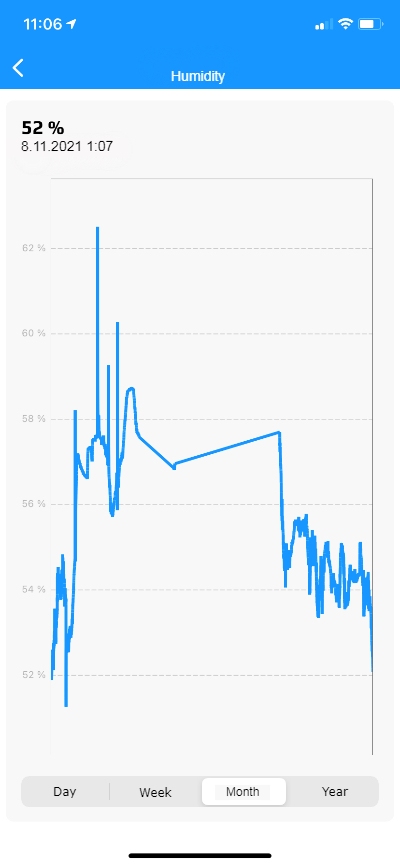
humidity – specific value
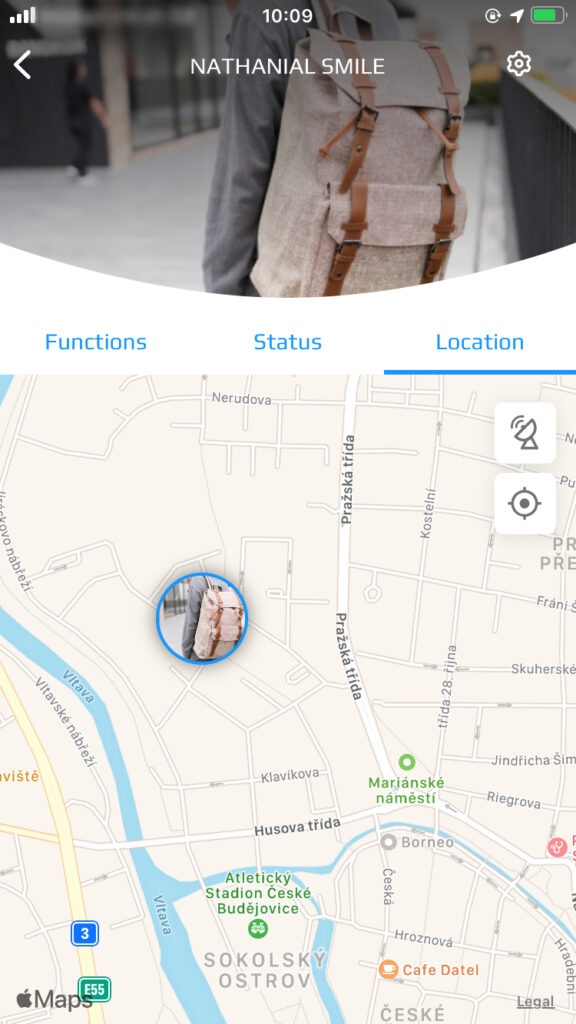
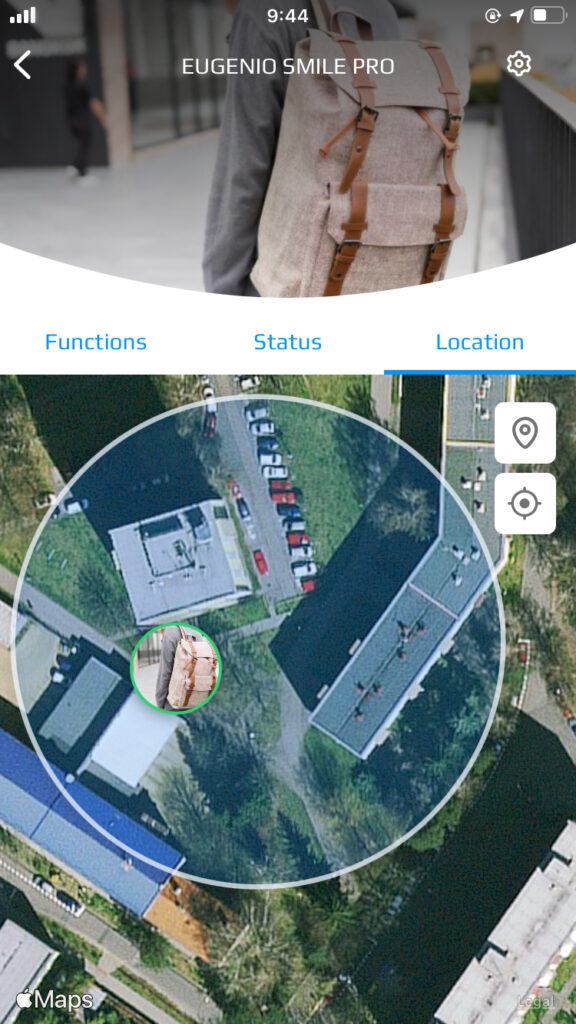
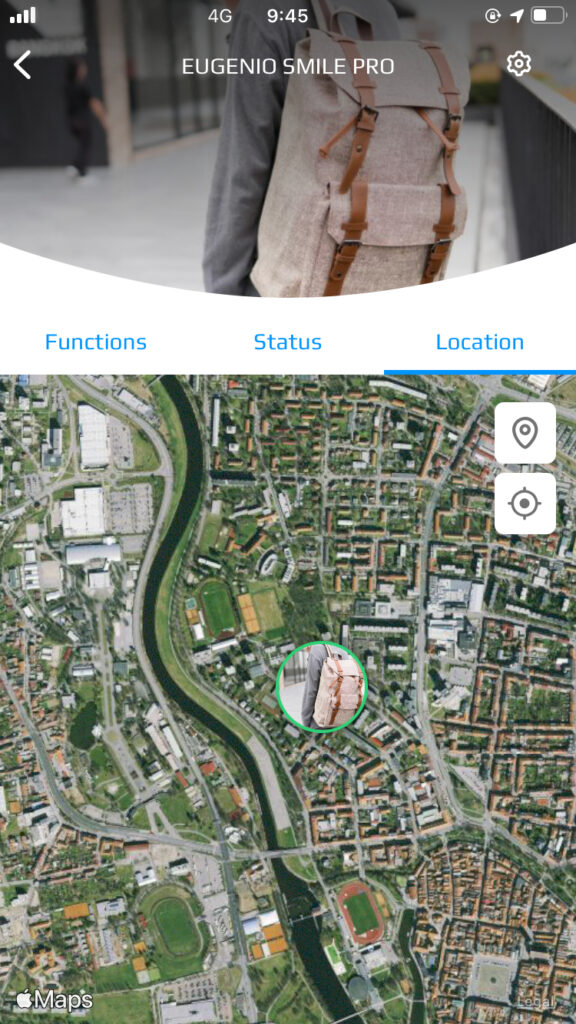
You can use the Location tab to view the current/last known location of the device (i.e. the
last time the device connected to your phone). If the device is currently
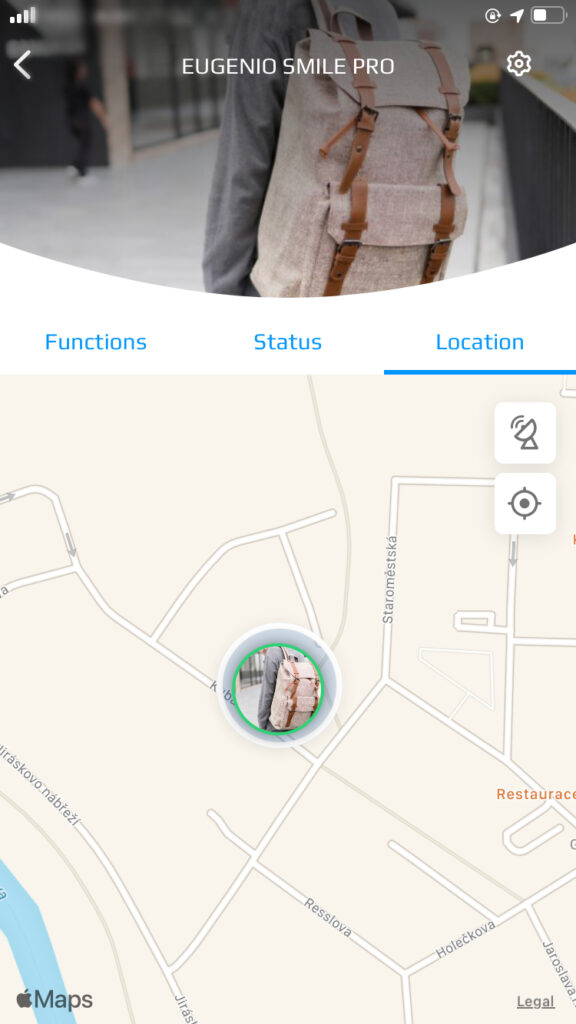
connected device
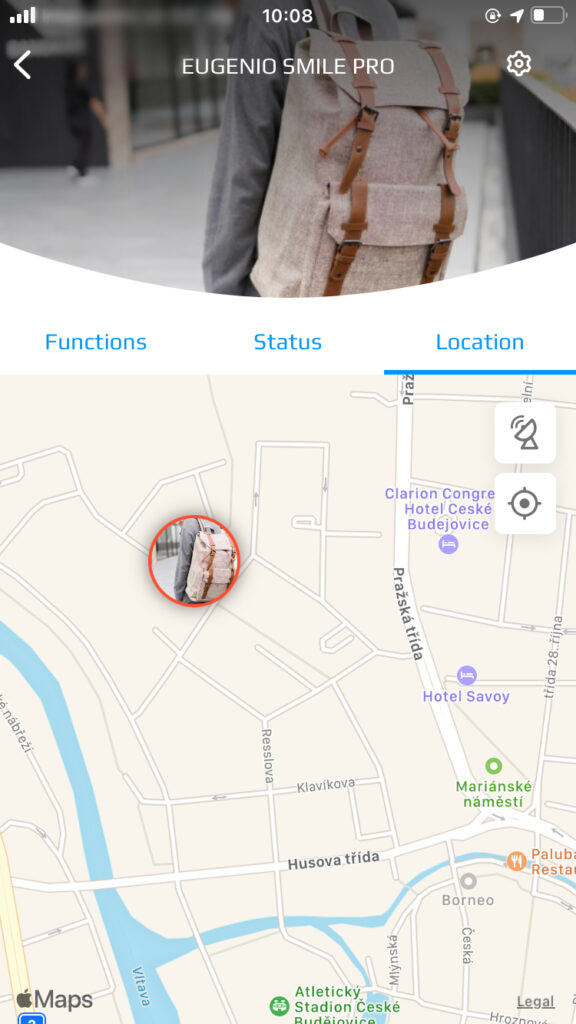
disconnected device
connected to another device
In the upper right corner of the map, there are 2 buttons with icons. Clicking on the top icon changes the ³normal´ map to an aerial map. Clicking on the second icon zooms out the map. Clicking on the top icon again will switch the map back to a normal map. You can zoom in the map using the touch controls.
flight map
flight map distance
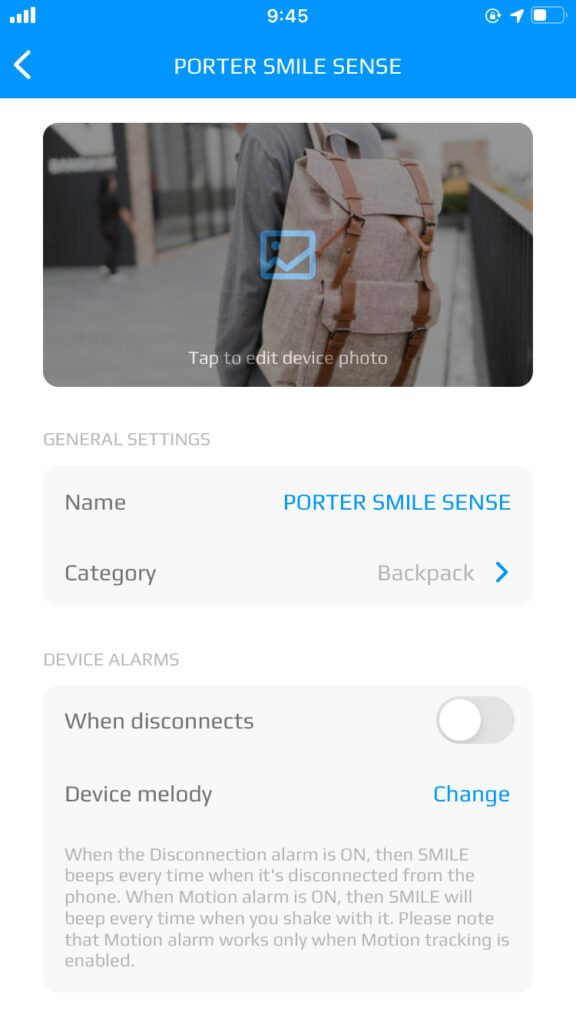
Each device can be customised to best suit your needs. If you are in the device detail, click on
the gear icon in the top right corner of the device photo to access the Settings section.
Once the device is paired, the app assigns a default photo to the device, which can be edited
here.
Double-clicking on this default photo will offer options from where the photo can be added:
settings
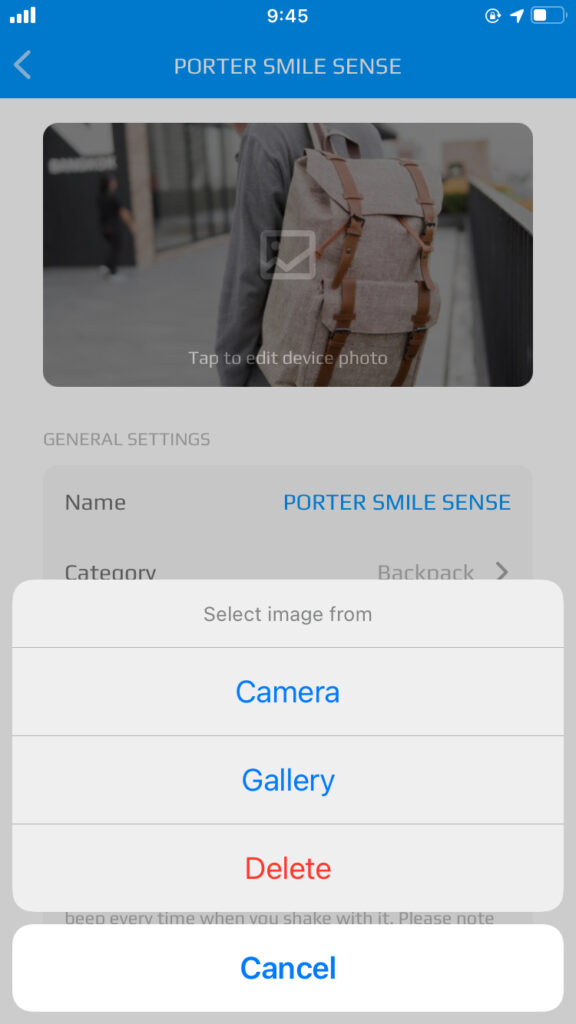
change image of device
category selection
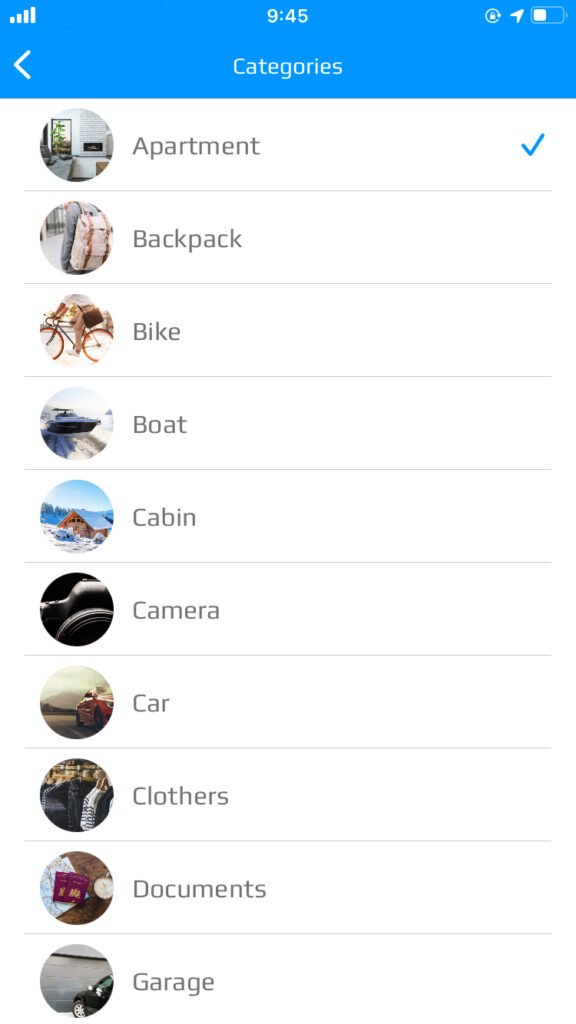
In the “General settings” section, you can edit the name of the device and double-click on the category name to select the category of the object the device is currently monitoring. Based on the selected category, the default device photo is updated. If you have already selected your own photo for the device, changing the category does not affect this photo.
You can select when to trigger the alarm. If a situation occurs for which the alarm is activated, the device will play a tune.
The tune can be selected after clicking on the “Change” option next to the Device tune. There are 10 different tunes to choose from.
For each device, you can set when you want to receive a notification on your phone.
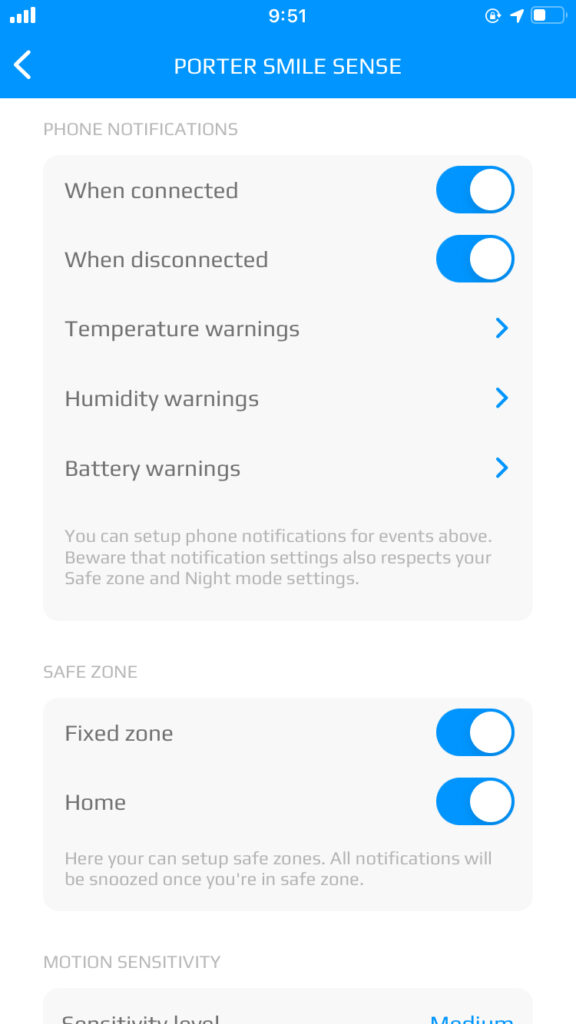
Warning – Battery
Warning – Battery status

Warning – Battery value
SENSE allows you to set up 2 additional notifications.
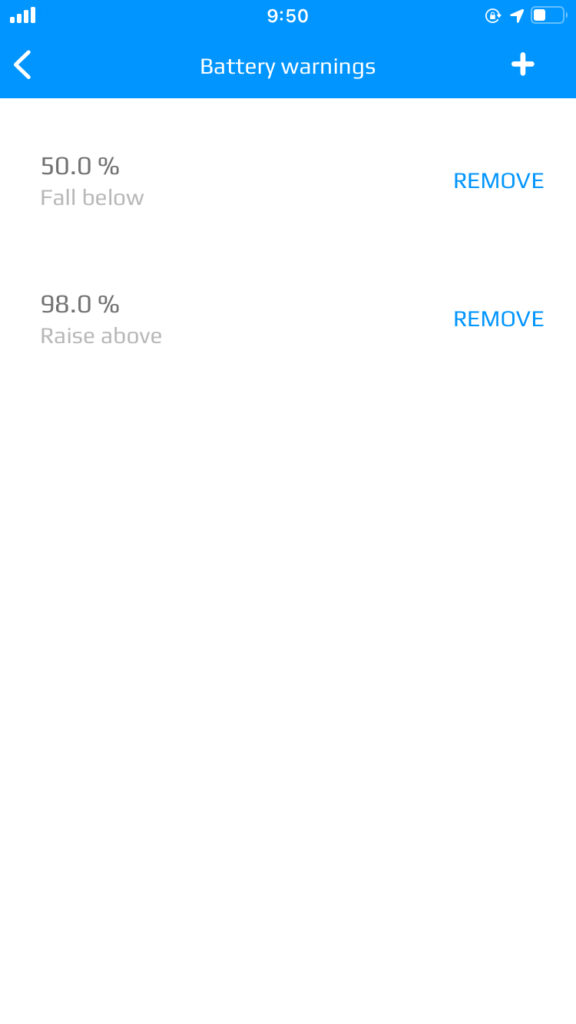
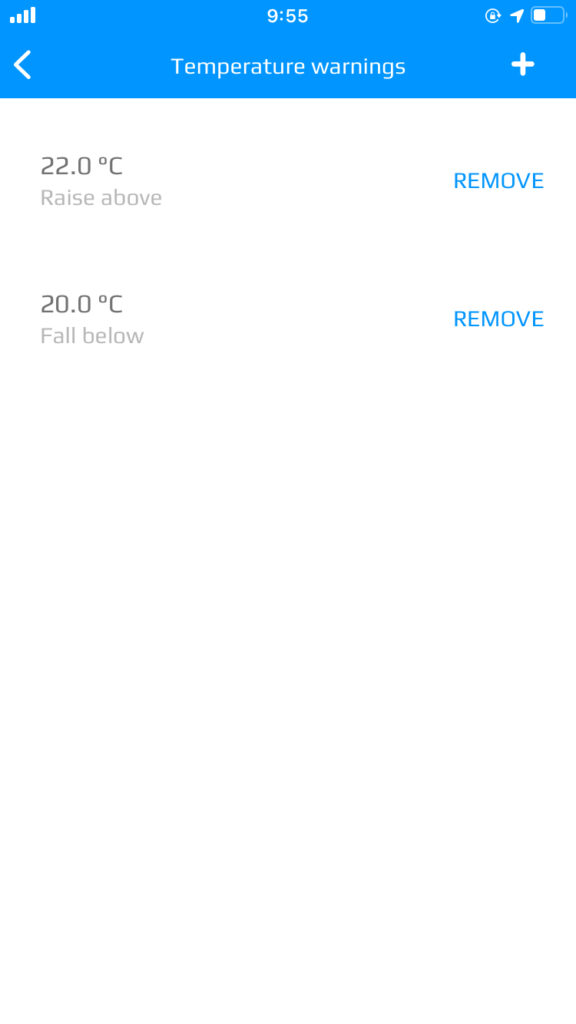
Clicking on the blue arrow next to the relevant warning will display a screen of existing, i.e. set limits. Click on the “REMOVE” option to delete the existing limits. Click on the plus icon in the upper right corner to set new limits. The plus icon will direct you to a page where you canset the value (percentage) and the direction (raise/fall) to get a notification when the defined change occurs. You must save the set values.

notification
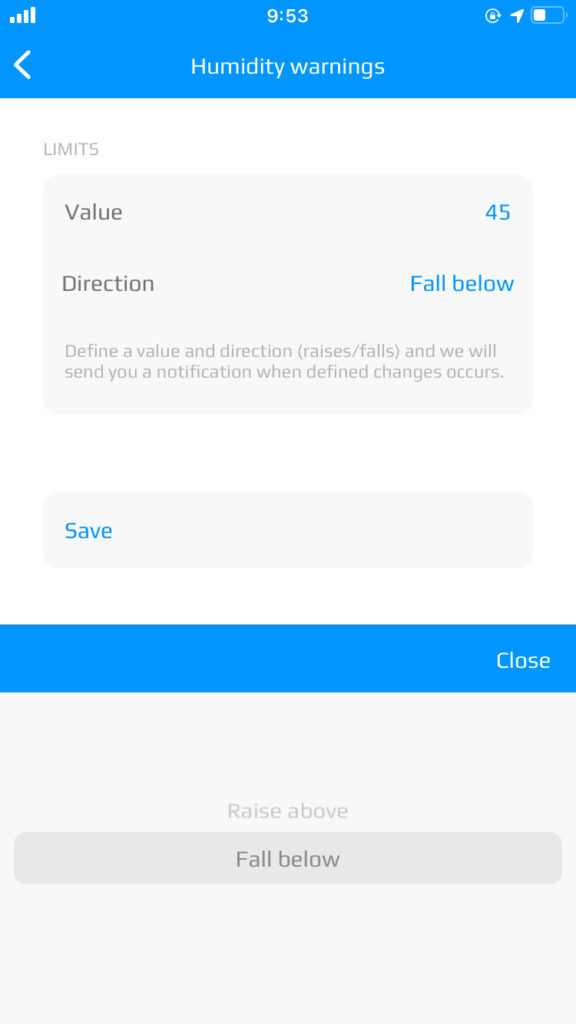
warning – setting limits
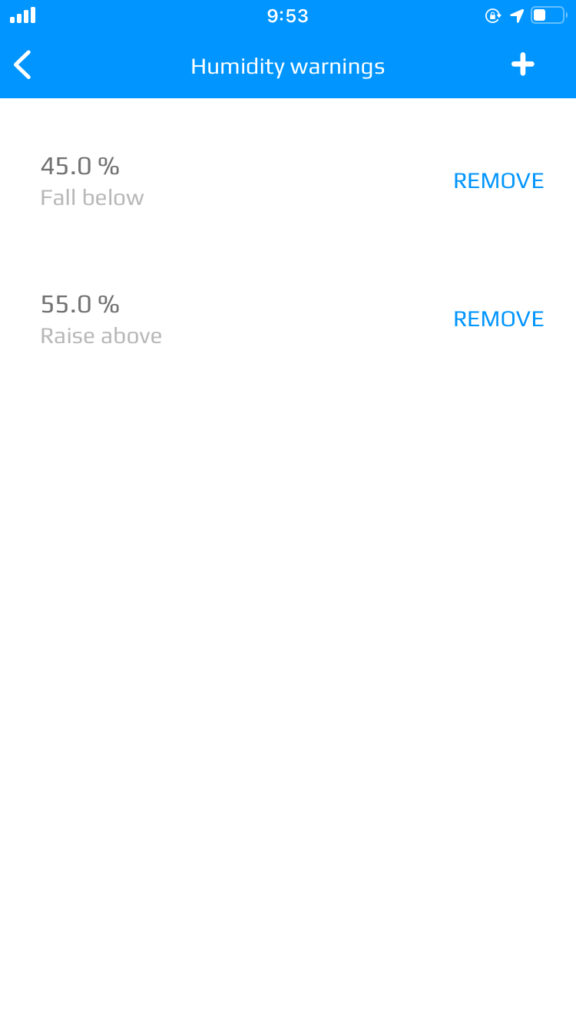
warning – set limits
If you do not have any limits set yet, the page is blank – see the “Temperature warnings – add” image below. The setting is done in the same way as for the humidity settings. The preset units are °C (however, the units can be changed).
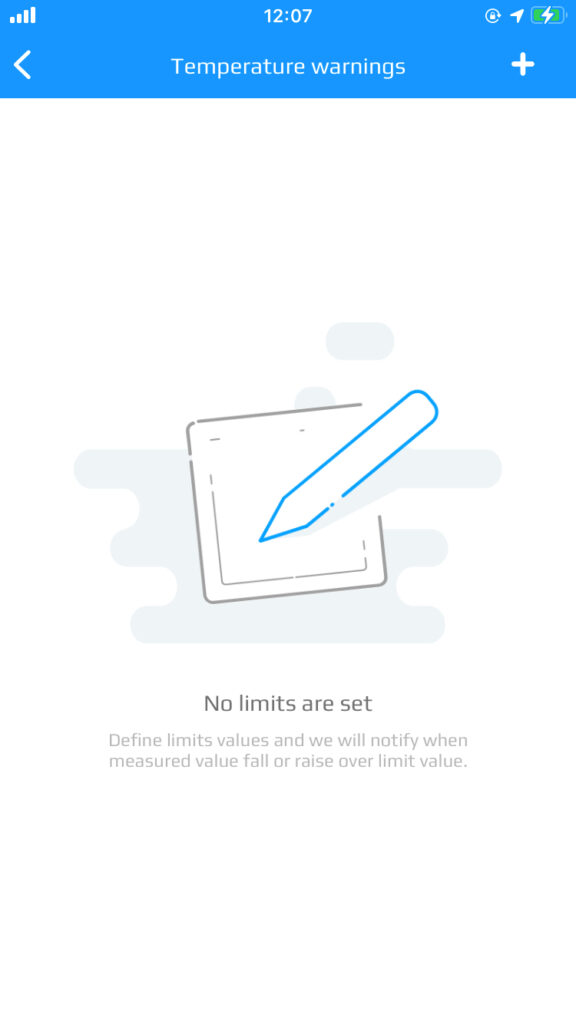
temperature warning – add in
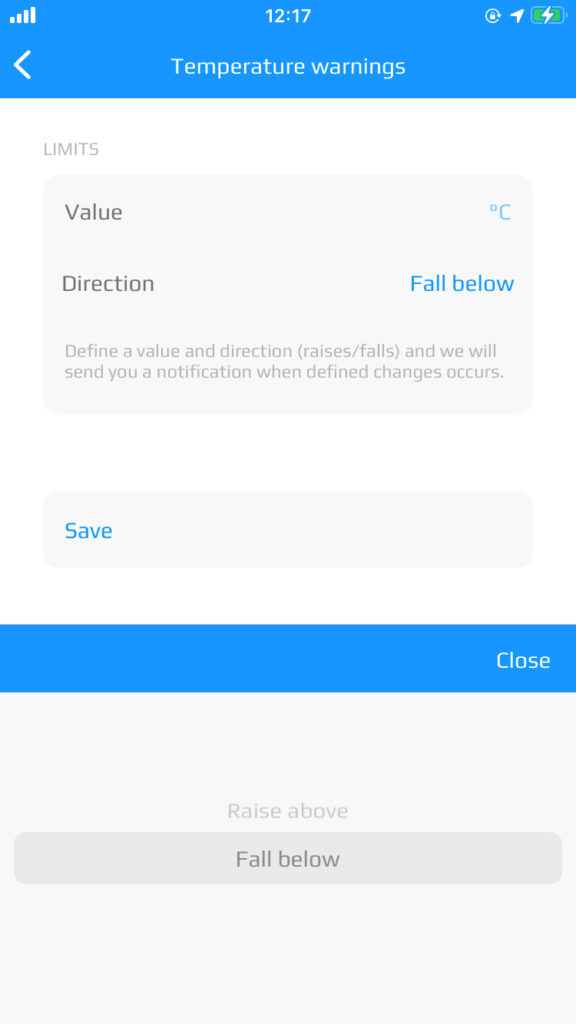
temperature warning – settings
temperature warning – limits
You can set motion sensitivity for the device. There are three predefined levels:
Safety zone – on
Safety zone – off
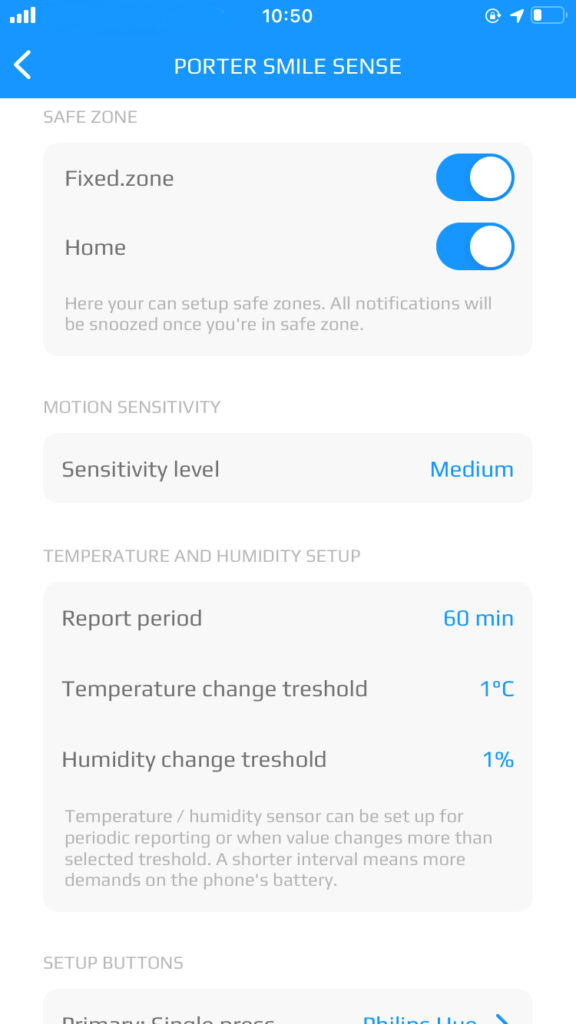
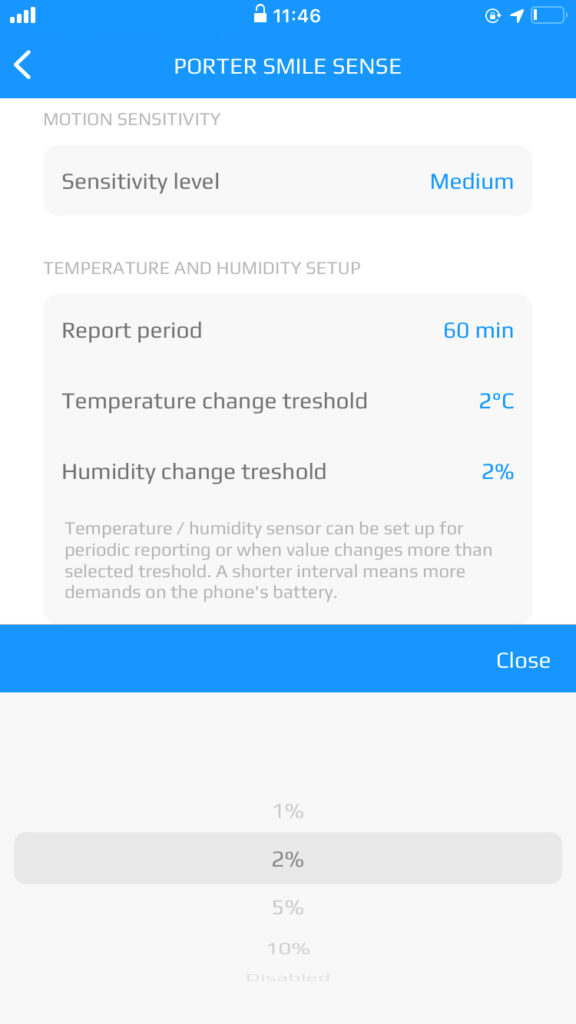
If you have enabled the function according to instructions in chapter 2.2.5. Functions – Start motion, in the temperature and humidity settings you can customize the time interval at which the measurement should take place, or at what change the value should be recorded.
Example 1: At 12:00 a.m. I set a report period of 60 minutes and disable the temperature/humidity change threshold. From the date of setting, the values will be reported at a regular hourly interval. That is, at 12:00 a.m., 1:00 p.m., 2:00 p.m., etc.
Example 2: At 12:00 a.m. I set a report period of 60 minutes and set a temperature change threshold of 2 °C. For example, the temperature measured at 12:00 a.m. is 20 °C. Between 12:00 a.m. and 5:00 p.m., the temperature varies between 20 and 21.9 °C, so the temperatures appear in the report after an hour (each time on the hour). But at 5:32 p.m. the temperature drops to 17.6 °C. Since this is more than the set 2 °C, the measurement for 5:32 p.m. will also appear in the report. The next report runs again in hourly mode from the last record – i.e. if there is no change of more than 2 °C, the next record will be at 6:32.
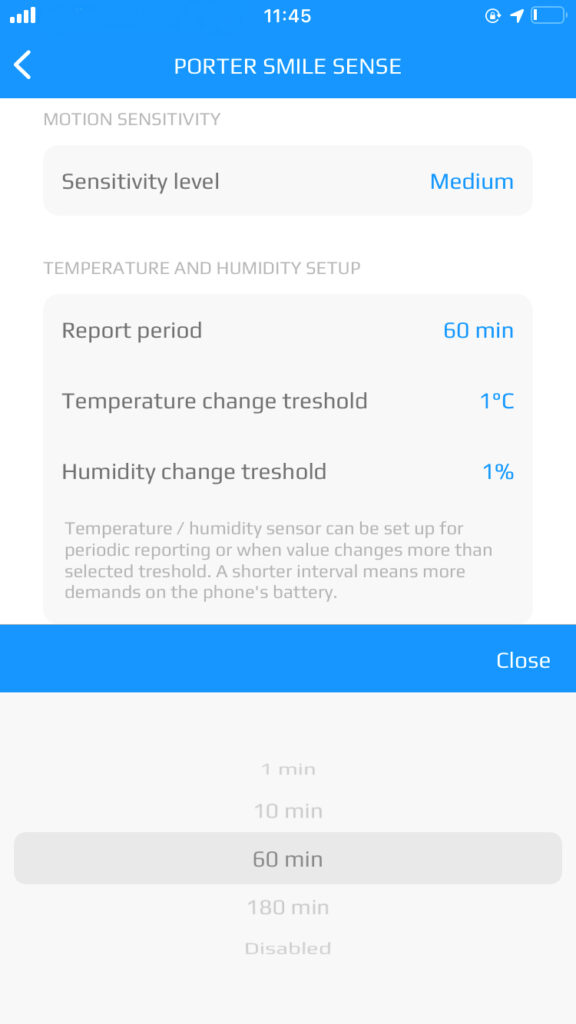
settings – reporting period
settings – temperature

settings – humidity
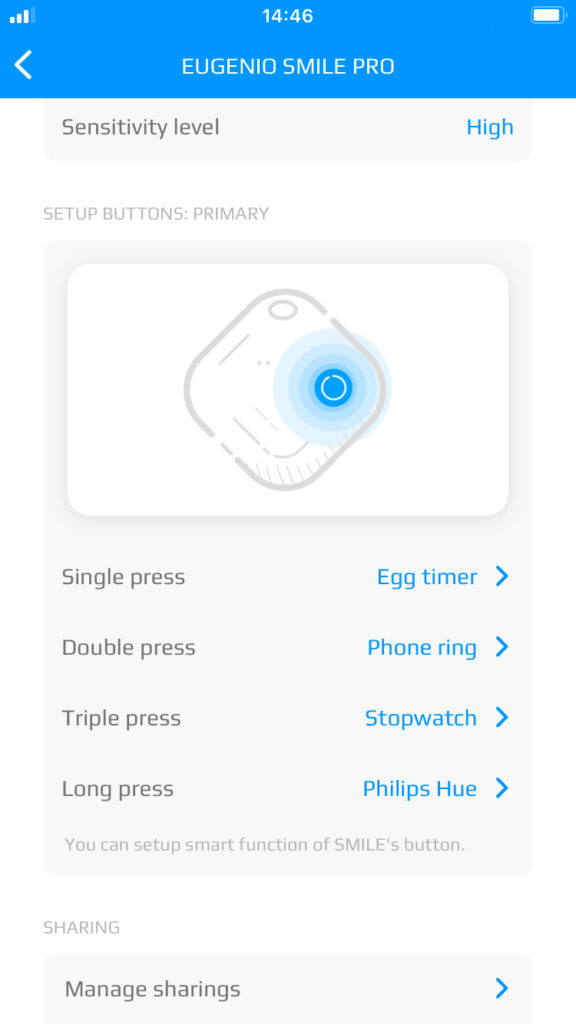
You can assign one of the predefined functions to the button on the device.
adding a function to a button
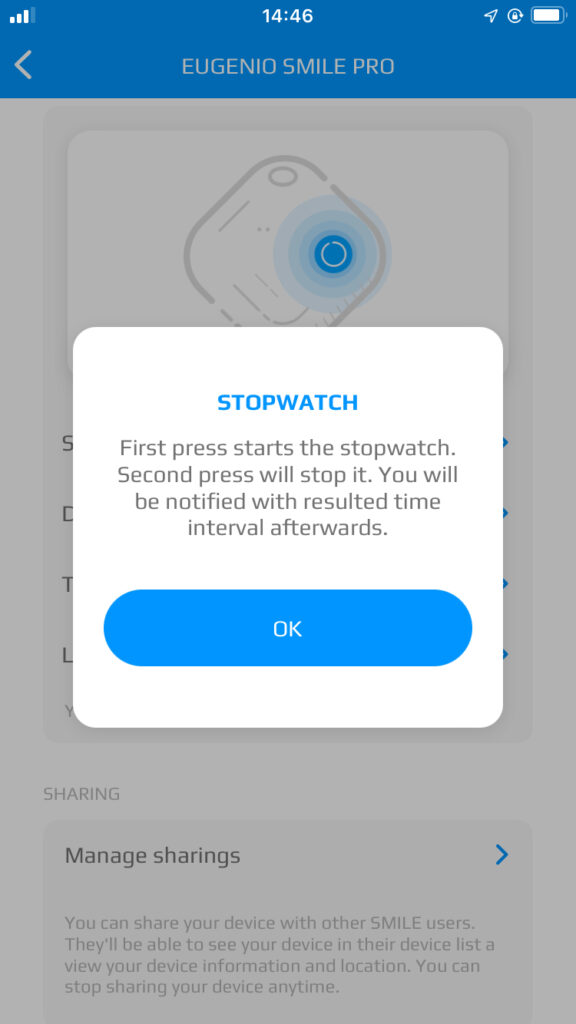
stopwatch – information
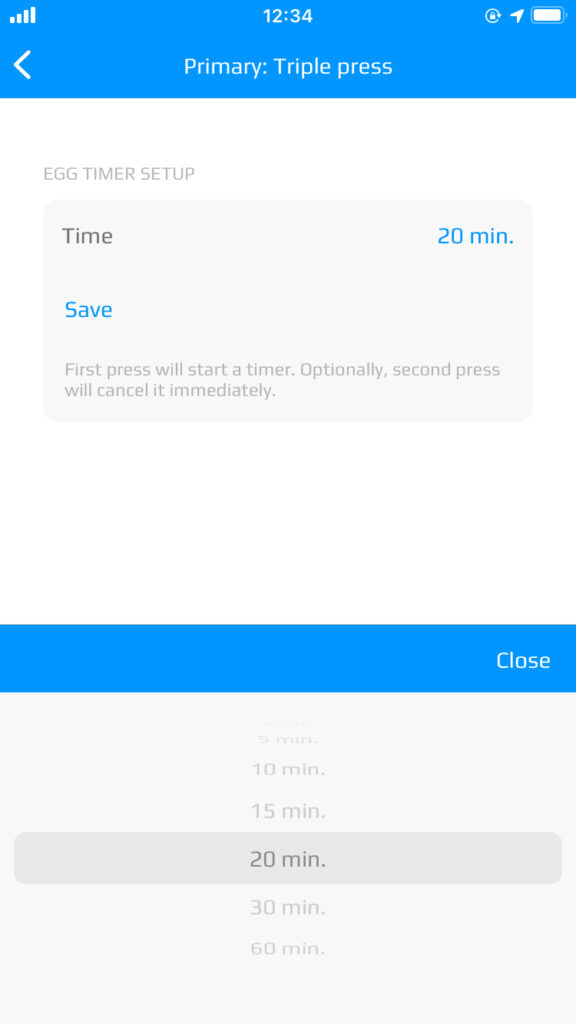
Minute – settings
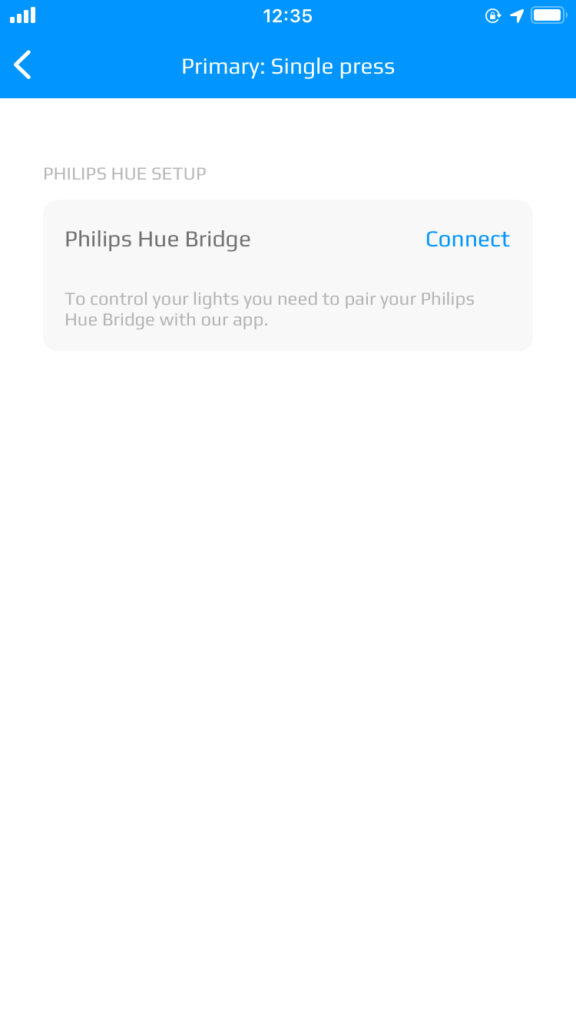
Philips Hue – settings
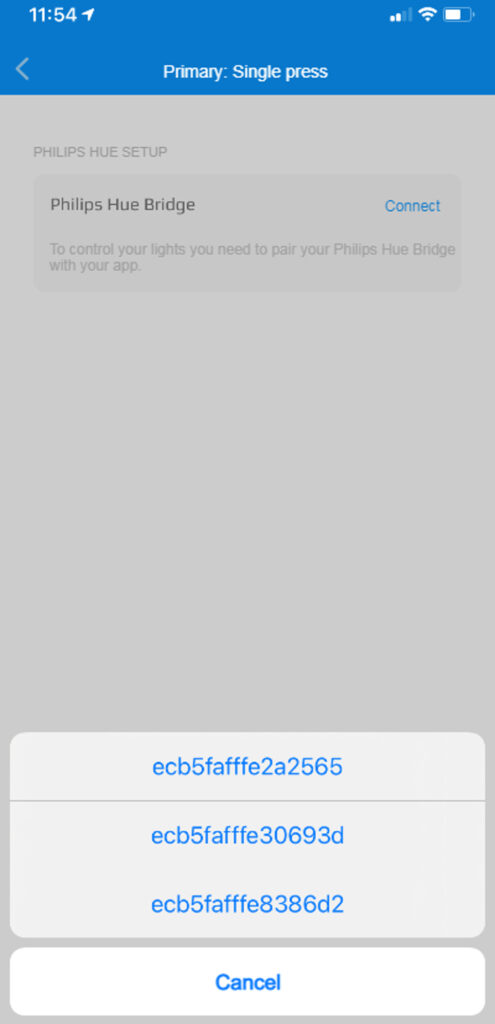
Philips Hue – connect
Unlike SMILE PRO, SENSE is equipped with 2 buttons and any of them can be assigned to any of the predefined actions.
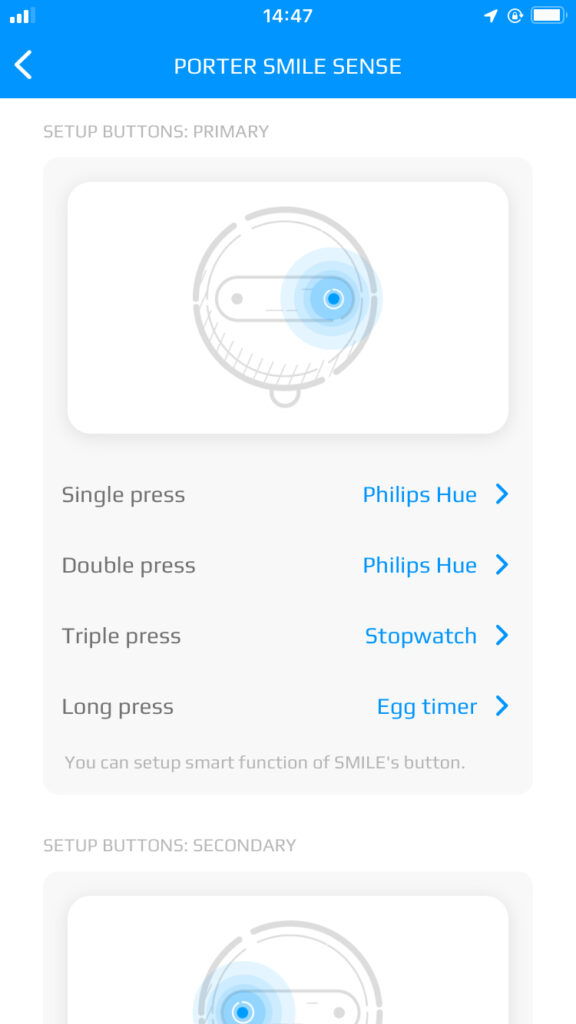
button settings – SMILE SENSE
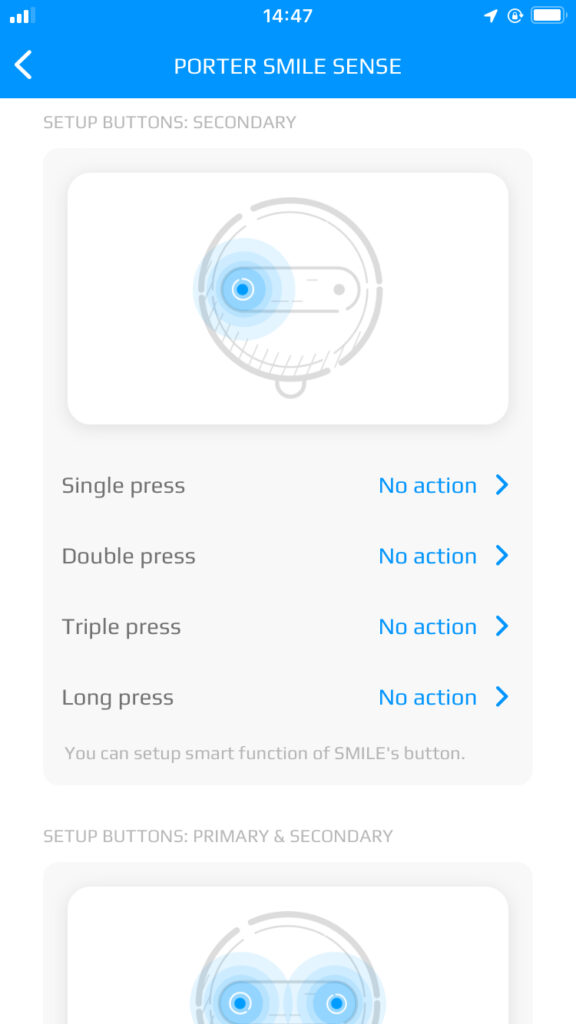
button settings – SMILE SENSE
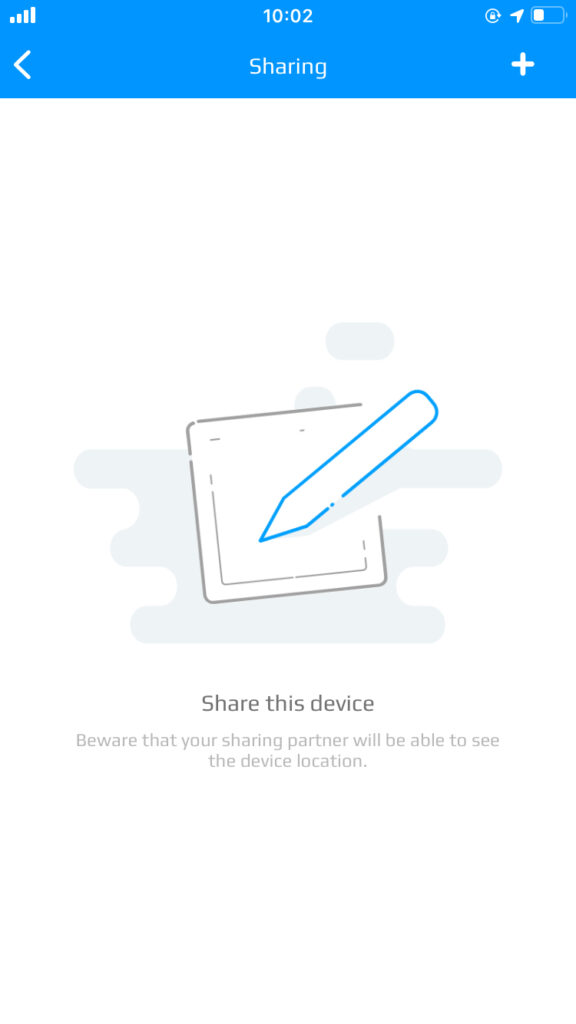
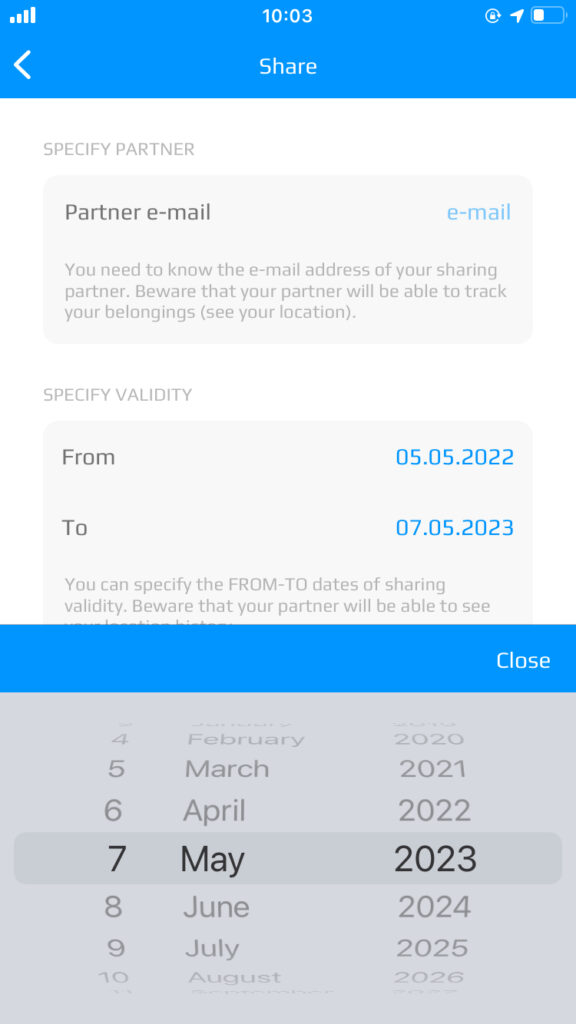
If you want to share your device with someone, just click on the “Share” option in the settings. If you already share your device with someone, you will see a list of users, or their e-mail addresses and the sharing period that you have set. If you haven’t shared your device with anyone yet, the page is blank.
Click on the plus sign to go to the next page, where you can add the e-mail address of the user you want to share your device with. You can limit sharing the device to a selected period (the predefined period is approx. 1 year). After saving the sharing, that user will receive a
notification that the device has been shared.
When the app is brought back from the background, this user’s device list is updated and the shared device appears among the other devices. If a user has an app open while a shared device
is added, simply send the app to the background and reopen it again to update the device list. The shared device will then appear in the list.
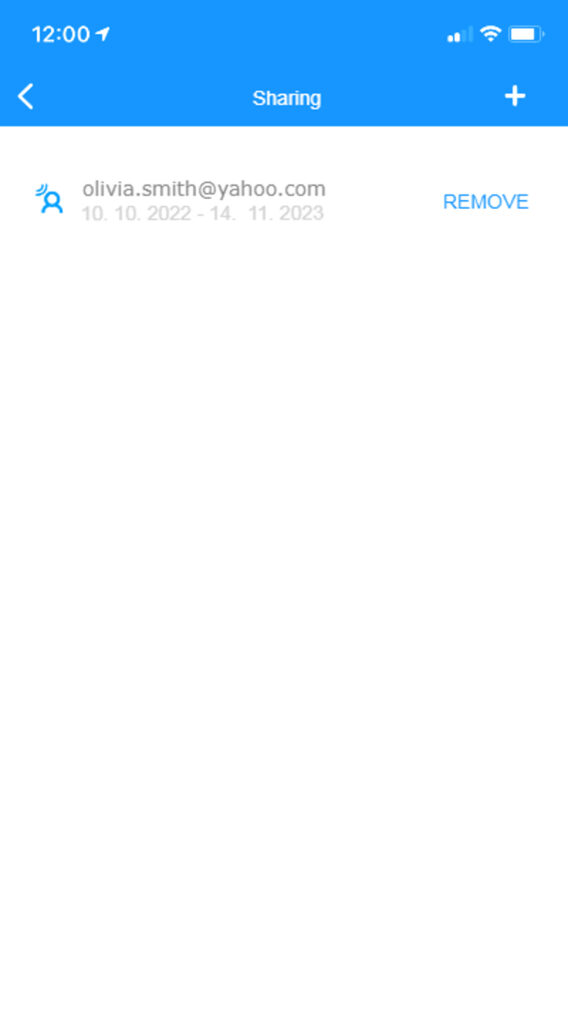
When you click on “Manage sharings” of selected device again, you will see whether it is a device that someone has shared with you (there are “waves” next to the user icon’s head on the left) – see the sdileni.png image on the next page, or whether you are sharing your device with someone else (there are “waves” next to the user icon’s head on the right). The sharing overview shows the e-mail address (account) with whom the device is shared and the time period for which the sharing is valid.
As the owner of the device, you can click on the “REMOVE” option to terminate the sharing. Similarly, the person with whom you are sharing the device can terminate the sharing in the same way. When the sharing is terminated, the device owner will then receive a notification that the sharing has ended.
share device
share settings
sharing
Only the owner of the shared device can change the its settings (e.g. device name, photo,
motion, temperature and humidity sensor activation, etc.).
Here you can set the shortcut for SIRI to make the device beep.
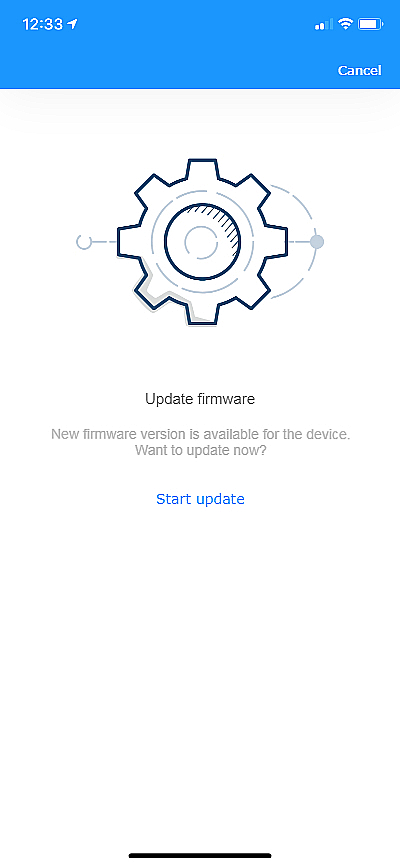
This section displays your device ID and the firmware version currently installed on the device. By clicking on the blue “Update firmware” option, you can upload a new version to the device (if available). Just follow the instructions on the screen. The firmware update option is available for SMILE PRO and SENSE devices.
Starting update
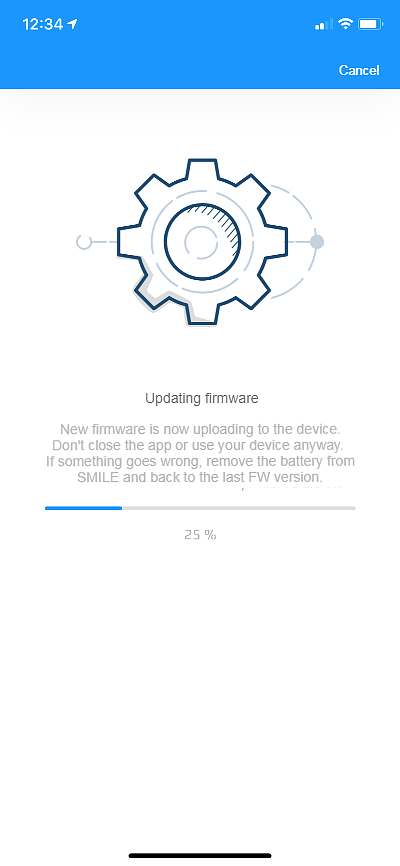
Installation process
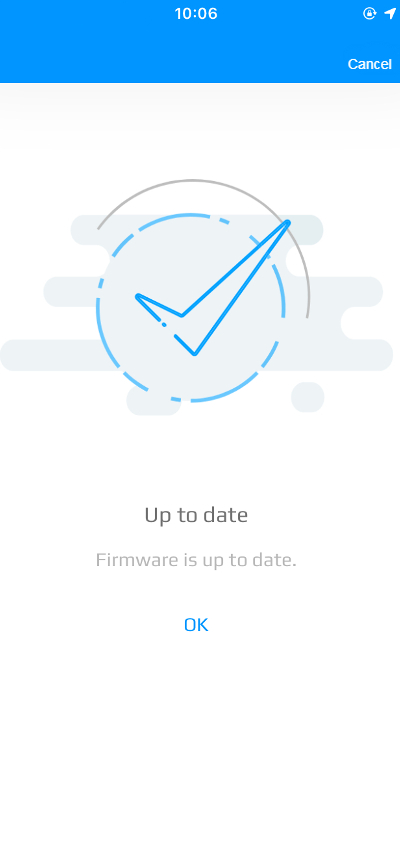
Finishing
After clicking on the red “Remove this device” option, a dialog box appears asking you to confirm the request. If you choose “YES”, the app will unpair the device from the account and the device can then be paired with another account.
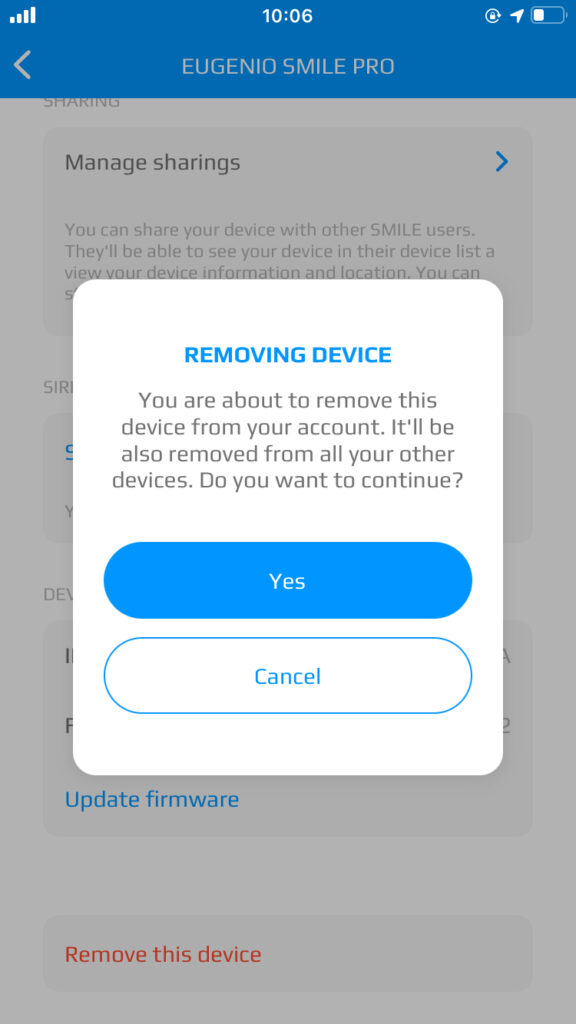
remove device
Double-click on the Location tab in the bottom bar to see a map with the location of your devices.
This is the location where your devices were last connected to your phone/tablet. Compared to the Location tab in the Device detail see chapter 2.4. Device detail – Location tab – the Location tab differs only in that it gives an overview of all your devices.
The map controls are the same as in 2.4. Device detail – Location tab.
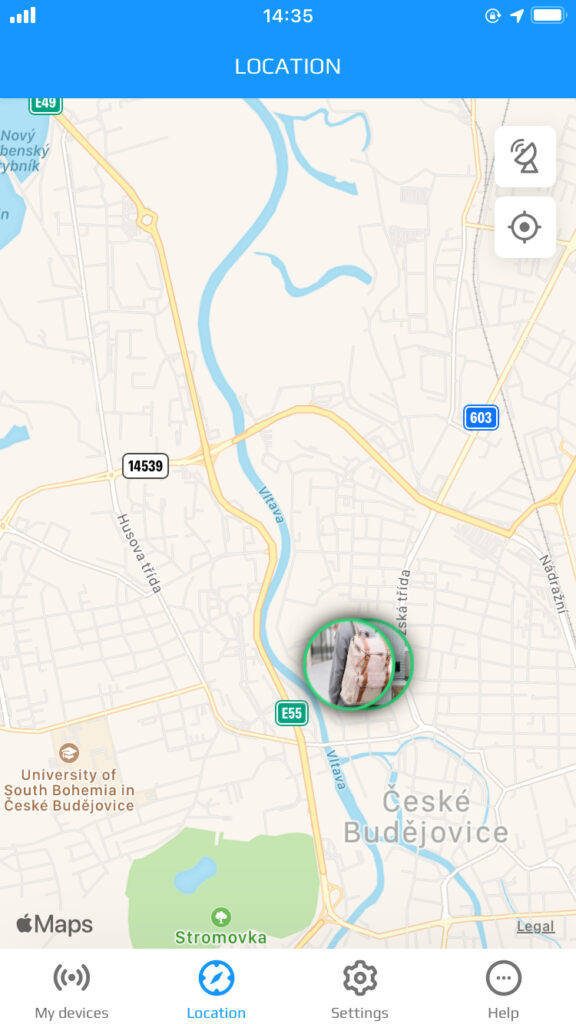
location of the device
Click on the gear icon at the bottom of the screen to display the settings page of the app.
In the “Sound Schemes” section, you can select your preferred sound for the app to use, e.g. for notifications.
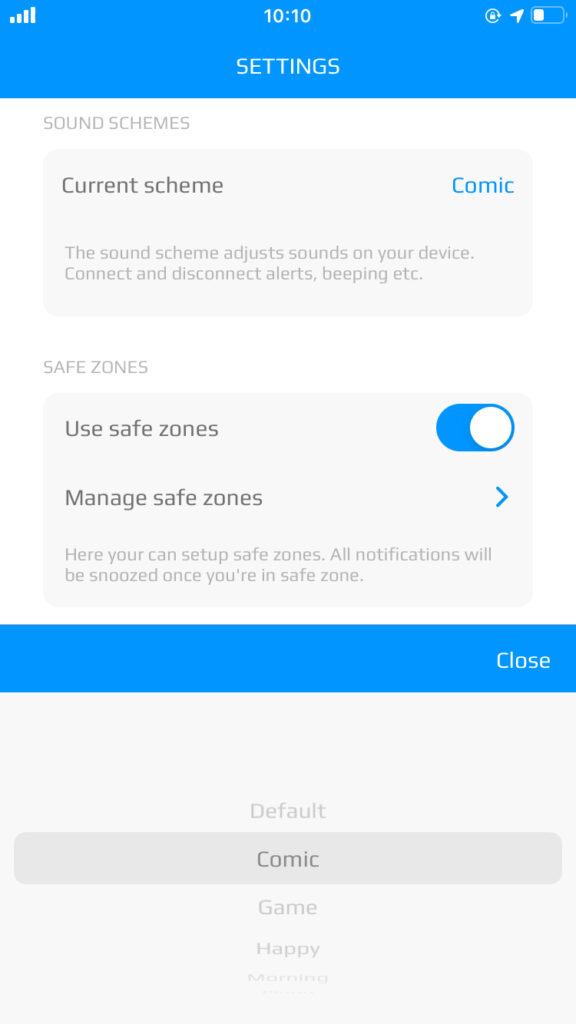
sound schemes
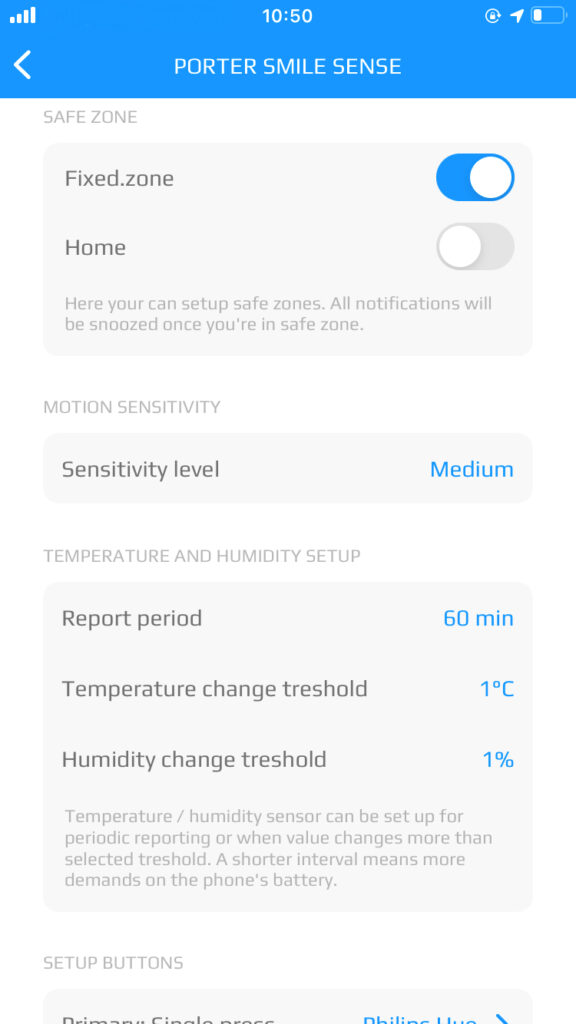
Turn on and set up safe zones to define where you don’t want to be disturbed by the app. Click on the “Manage safe zones” option to see the zones that you have already set up. To create a new zone, just click on the plus icon in the upper right corner and be in the zone you want to add as a safe zone. A safe zone is the Wi-Fi network you are currently connected to. The relevant zone details are pre-populated (location and Wi-Fi name). You can name the zone
yourself. Once saved, the zone is added to the others. You can then turn on the selected zone for each device. See chapter 2.5.5. Settings – Safe zones for more information.
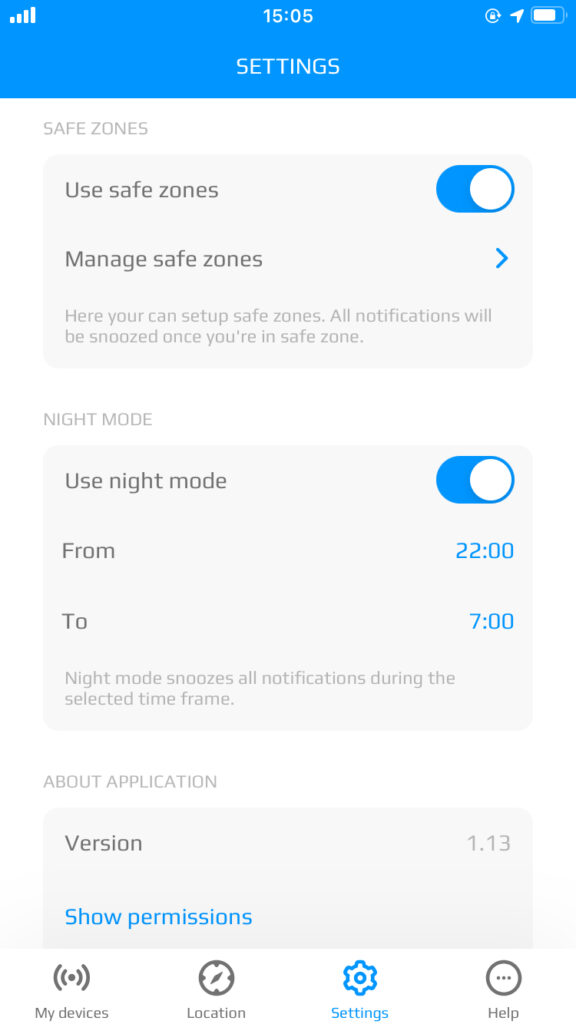
safe zones
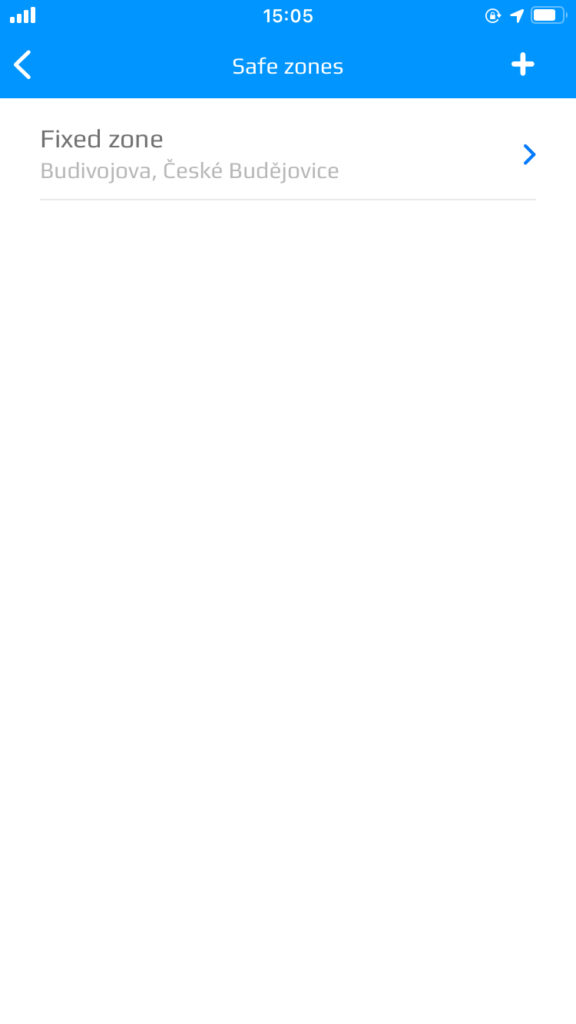
safe zones
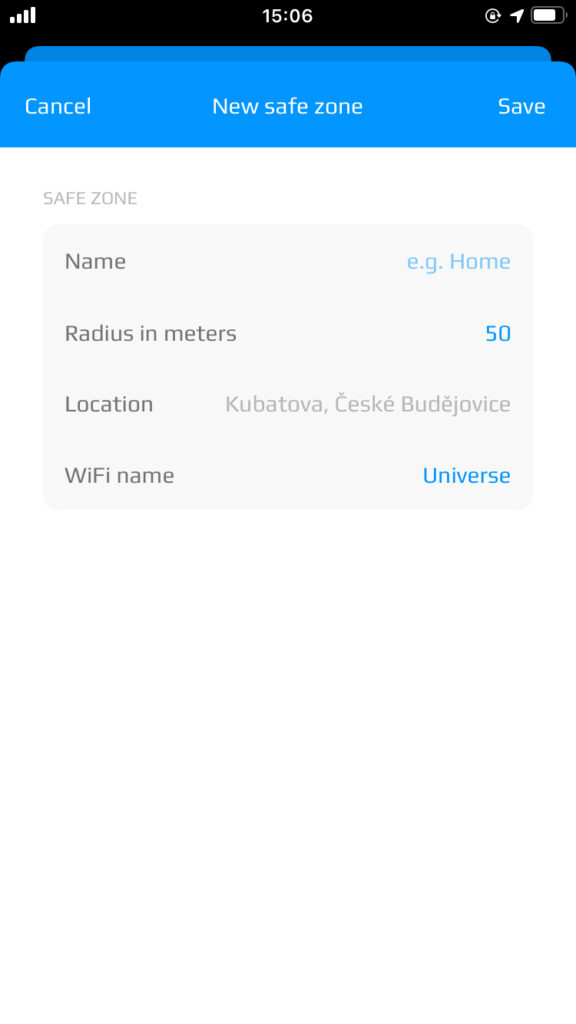
new safe zone
Turn on and set the time period to define the time period during which you don’t want to be disturbed by the app.
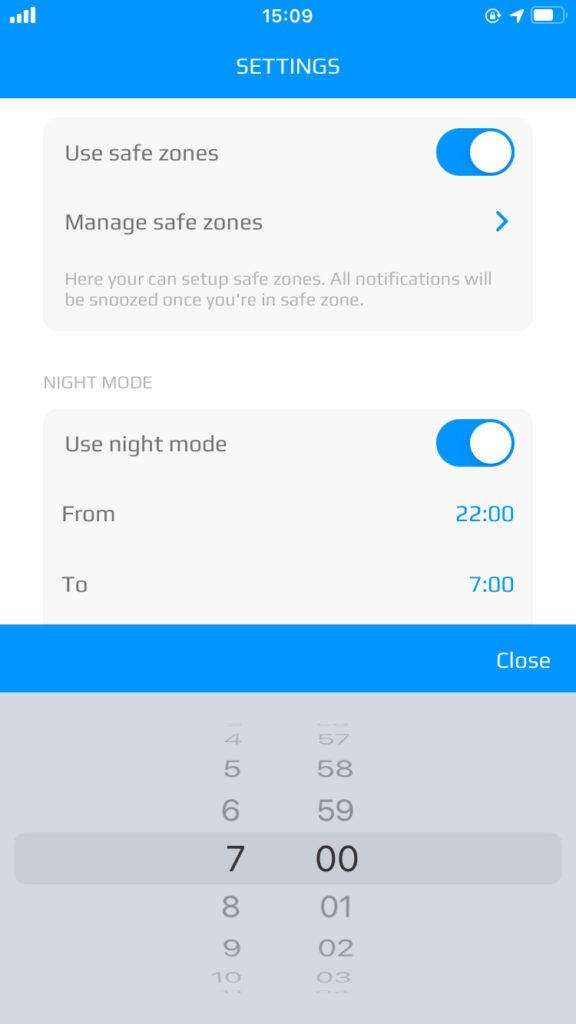
night mode
In the “About application” section, you will see the number of the currently installed version of the app. There is also a link to a page with an overview of the app’s permissions. Here you can check what permissions the app requires and which ones you have granted.
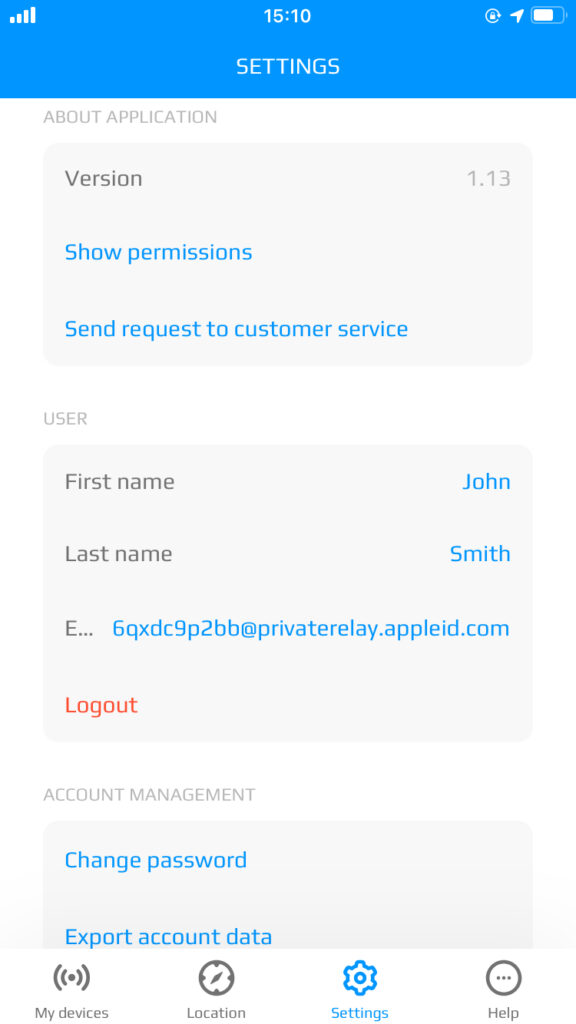
about application / user / account management

permissions overview
The “User” section shows your first name, last name and e-mail address. In case someone wants to share their devices with you, this is the address they need to enter to start sharing them with you.
There is also an option to “log out” from the app. Please note that after you log out, your devices lose their connection with the app and are no longer monitored!
In this section, you can change the password you use to log in to the app, but also export your account data. The data is exported to a ZIP file. By clicking on the “Delete Account” option, you can delete your account and the connections
between your account and the devices you use. You must confirm this request in the dialog box before the account can be deleted. Deleting the account will completely delete the information from your system.
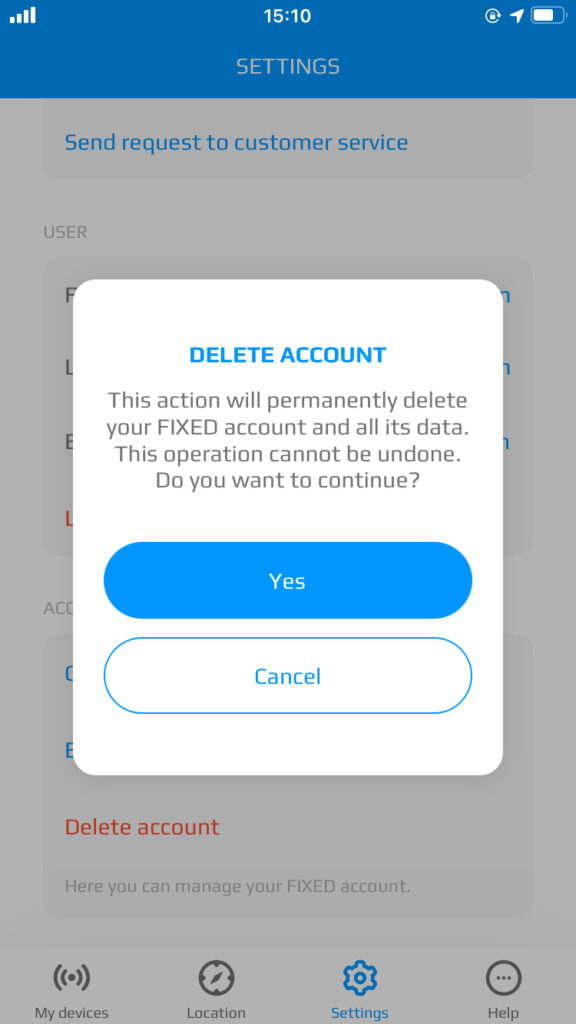
delete account
In case of any problems, please consult the Help tab. This section has three main topics:
Double-click on the selected topics to display frequently asked questions. Click on the selected question to display the answer.
If you have forgotten the password to your app account, tap on the “FORGOTTEN PASSWORD” option to bring up the e-mail entry form. After entering your e-mail address and clicking on “OK”, an e-mail will be sent to you with instructions on how to reset your password.
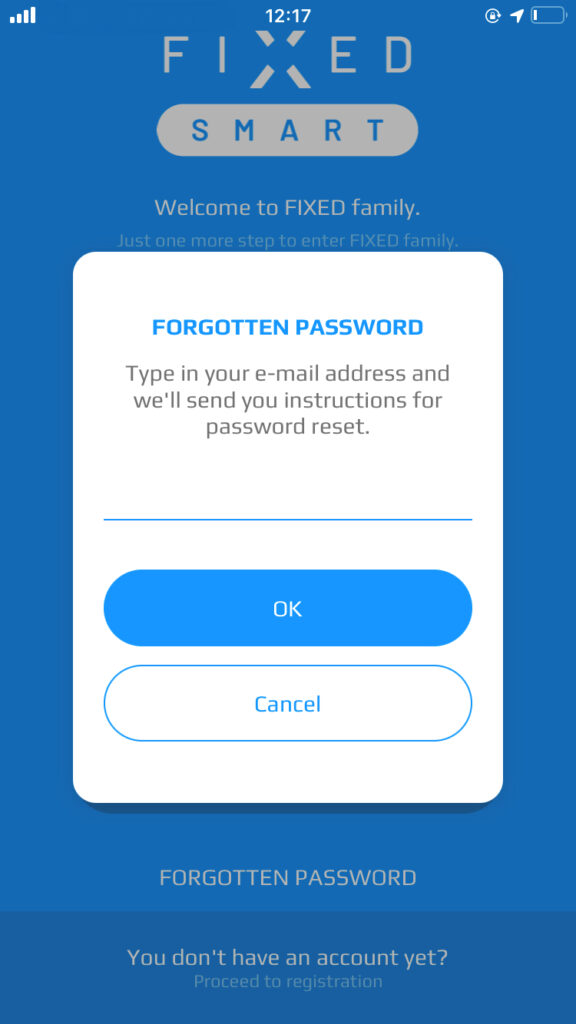
Forgotten password
Based on your ID (email), we were unable to find any of your devices. Please add your device manually.
If you want to create new FIXED account, please go to Google Play or Apple App Store and download our Smart App (Name: FIXED Smart).
 Holders
 Chargers
 Protection
 Music
Music
 For wearables
 Other
Other
 Phone cases
 Tablet cases
 Laptop Cases